
Abstract
Able is an open-source A/B testing framework that makes it easy to set up and track A/B tests for Jamstack applications on Cloudflare’s edge network. This case study explores how Able facilitates A/B testing by abstracting away the process of splitting the traffic between two or more variants of a web site and setting up Umami analytics to track the differences in performance.
Quickstart Guide:
Prerequisites:
In order to set up an A/B test between two or more variants of an app, you first must create the variants on git branches. These should then be deployed on Cloudflare Pages, a platform built for quickly and easily deploying Jamstack applications directly from Github.
When you're ready to start using Able:
npm i -g @abletest/able- Run
cdk bootstrap aws://${AWS_ACCOUNT_NUMBER}/'us-east-1'(must use US East 1 region) able setupSetup of Umami server infrastructure takes approximately 20-25 minutes.able configGenerates a config file for your test configurations.- Create test branches of your git repository.
able deployTo deploy the split test to Cloudflare.
0. Overview
To understand what Able is and why we built it, we'll first lay some groundwork. We’ll explore the A/B testing process and the Jamstack architectural pattern as well as the edge compute capabilities Able relies on.
1. What is A/B Testing?
People use the web for many different things. Consequently, there is almost unlimited variation in web applications. Therefore, there are unlimited decisions to make regarding design both on the frontend and the backend. How do you know which decision to make?
One strategy that would be useful in this situation is A/B testing. A/B testing is a form of experimentation to better understand user behavior. In general, an A/B test begins with a hypothesis about how a certain change in a web page will impact user actions, such as clicking a link or buying a product. To test this hypothesis, multiple versions of the website must be created.
While the test is being conducted, visitors to the website are served one of the page's variants.
During that time, engagement with each version of the website is measured and collected. This data can then be analyzed against the baseline to detect changes in click rates, conversion rates, revenue generation or amount of time a user spends on the site.
1.1 Why perform A/B tests?
Imagine your business has a website, and it is generating traffic. You’re keeping track of the way visitors engage with your site, because you want to maximize the return on your investment in this essential technology.
At some point, you may begin to wonder if you could increase visitor engagement by making certain changes to your website. There’s a risk to designing your application based on your own preferences. User behavior is difficult to predict, unless you have concrete data to drive your decisions.
The benefits of A/B testing are well-established and widely cited. A/B tests can lead to reduced bounce rates, increased conversion rates, increased sales, and reduced cart abandonment.
1.2 A Real World Example
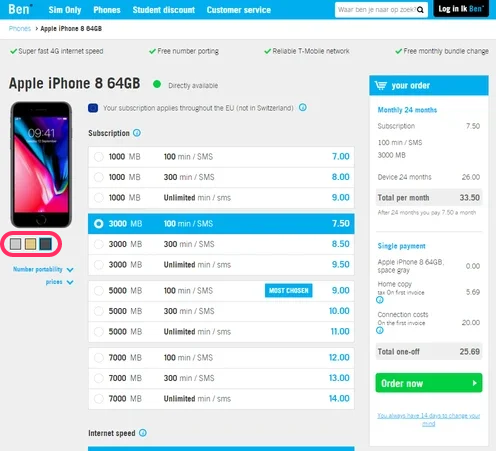
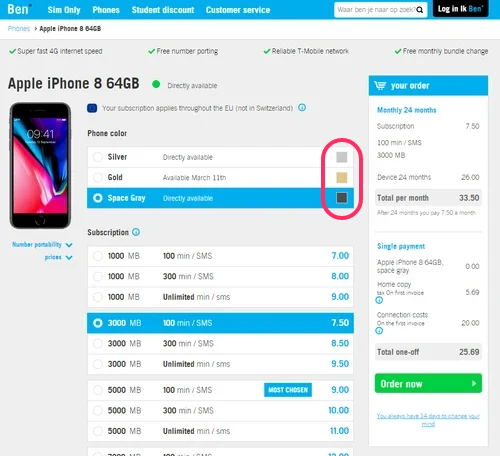
Ben is a Dutch telecom company that was looking to improve conversion rates through its e-commerce platform. One of the changes it chose to test was moving the color palette selection to a more prominent location. The picture on the top is the control, and the picture on the bottom is the test variant, which ran for two weeks. Through this test the company was able to achieve a 17.7% increase in conversion rate as well as a reduction in customer service calls requesting a color change.
1.3 Traditional A/B Testing Methods
Now that we understand how useful A/B testing is, let’s take a look at how A/B testing actually works in a traditional client-server architecture.
A user makes a request for a web page by typing a URL into their browser. They are then randomly assigned to either the control group or a test group and served the appropriate version of the page.
The logic for splitting the traffic between the two pages can either live on the client side or the server side. Both have benefits and tradeoffs, which we’ll expand upon in later sections, as we examine web application architectures.
Because experimentation is an important part of optimizing your website, there are a wide range of testing frameworks and services available, providing a variety of services, from simple to complex. In general, they facilitate creating variants, deploying them, splitting the traffic and some of them also include built-in tracking and analytics tools to help you determine which variant provides the most optimal user experience.
2. Web Application Architectures
To help understand the challenges presented by A/B testing in a Jamstack application, we'll first take some time to review the basics of web application architecture in the traditional model.
2.1 Client-server Architecture
Traditionally, web application architecture consists of two sides: the client side and the server side. The client is a web-enabled software application, such as a web browser, issuing requests to the server for various resources. The server is responsible for responding to those requests appropriately.
The server side usually consists of three components: a web server, an application server, and a database.

The web server receives the requests from the clients and routes them to the application server. Then the application server must produce a response. To do this, it may need to query the database. When it has created the response, it sends it back to the web server, which sends it back to the requesting client.
2.2 Scaling an Application
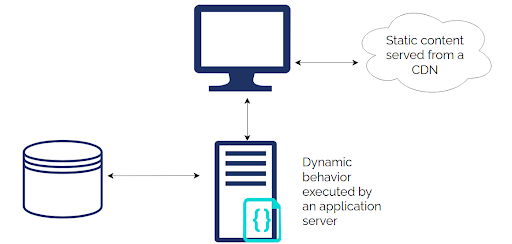
When an application starts to grow, developers try to find ways to serve it more efficiently. One of the ways they can do this is by differentiating between static and dynamic content.
Static content is that which doesn’t change very often, such as images. It does not have to be produced every time some client makes a request, only retrieved from its home on the server.
Dynamic content is content which must be created for every request that comes to the server. Any content which depends on the application server querying the database to create a response would be an example of dynamic content. Dynamic content is more expensive and time-consuming to serve than static content, because it must be newly created for every request.
2.2.1 Content Delivery Networks (CDNs)
A CDN, or content delivery network, is a global network of caches whose purpose is to host the static content of your website. It has nodes all over the world, and each node can store replicas of your website’s static assets.

When a client makes a request for a static resource, it can be served by the node of the CDN in closest proximity to that client.
This has two benefits:
- Serving static assets from the location closest to the user reduces the time it takes to complete the request-response cycle. This means that users will receive content faster.
- By extracting simple static content requests to an external CDN, the workload for the application’s infrastructure is significantly lightened: rather than handling all requests, it will only need to handle requests requiring dynamic content.
Of course, dynamic content must still be produced by the application server, which may require communication across great distances. Having the CDN serve static content is good, but a site’s performance may still suffer due to time-consuming communication between client and server to produce dynamic content.
2.3 Jamstack
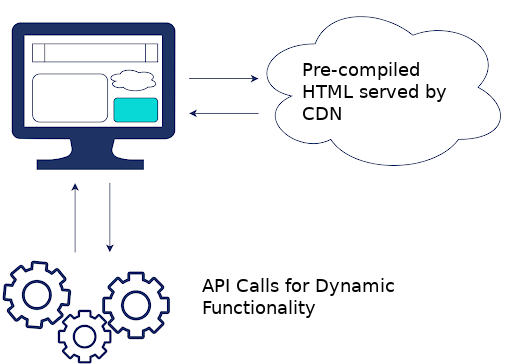
The Jamstack architecture provides an answer to this problem. It takes advantage of the benefits of using a CDN to another level by hosting all of a website’s assets on the CDN.
To make this possible, Jamstack applications pre-render their HTML. Pre-building sites is often done using a static site generator, such as Gatsby or Next.js. This process bundles the application code into a collection of static HTML files, which can then be distributed to CDN servers globally.
This combination of pre-rendering static assets and caching them in CDN nodes results in exceptionally fast applications.
Additionally, since all assets are served from the CDN, there is no need for a dedicated application server at all!
But, you may be wondering, if a server is responsible for generating dynamic content, and the purpose of a CDN is only to host static assets, how could we possibly achieve dynamic behavior from a website hosted on a Jamstack architecture?
2.3.1 APIs
The answer is APIs. APIs, or Application Programming Interfaces are third-party services that can be called from Javascript running in the browser, that accomplish all the dynamic behavior that would be handled by a server in a traditional, non-Jamstack architecture.
Sometimes Jamstack is referred to as “serverless” architecture because it makes heavy use of APIs to abstract away the need to provision and manage servers.
The term “serverless” in this context is a little misleading because servers are still involved within the APIs -- however, these are usually managed by third parties in a thriving API marketplace, which means developers can focus on building the application itself, rather than using time and resources to manage infrastructure.
2.3.2 Pros and Cons of Jamstack
There are many benefits to using a Jamstack architecture.
Jamstack applications are incredibly fast. Because they serve content from close physical proximity to the user, they reduce the HTTP signal latency, resulting in noticeably faster load times.
They are quick and convenient to develop, with git-based workflows and automated build and deploy processes.
And finally, with Jamstack, developers don’t have to provision and manage servers, allowing developers to spend more time focusing on their application itself.
Of course, the Jamstack isn’t the right architecture for all use cases.
The larger the site, the longer the build process will take – it could even take several hours or days. Because of this, large applications or sites that are frequently updated may do better with a more traditional architecture.
Also, the lack of a database and server-rendered content present some limitations. For instance, we can’t use a server to dynamically split traffic between two alternate versions of a site in order to perform A/B testing.
3. A/B Testing Jamstack Applications
When it comes to A/B Testing, the Jamstack architecture presents a problem. In order to conduct an A/B test, we must have multiple versions of our website available. Every time a user visits our website, we must choose one of those versions, and serve it in response. We’ve said that the logic that chooses which version to serve may be executed on either the client side or the server side.
But in a Jamstack application, effectively, there is no server-side! All the dynamic behavior of the website has been abstracted to API’s, while CDNs serve only static markup files. This seems to suggest that we are limited to client-side strategies for A/B testing, where the client decides which version of the website to display.

3.1 A/B Testing Using Client-side Rendering
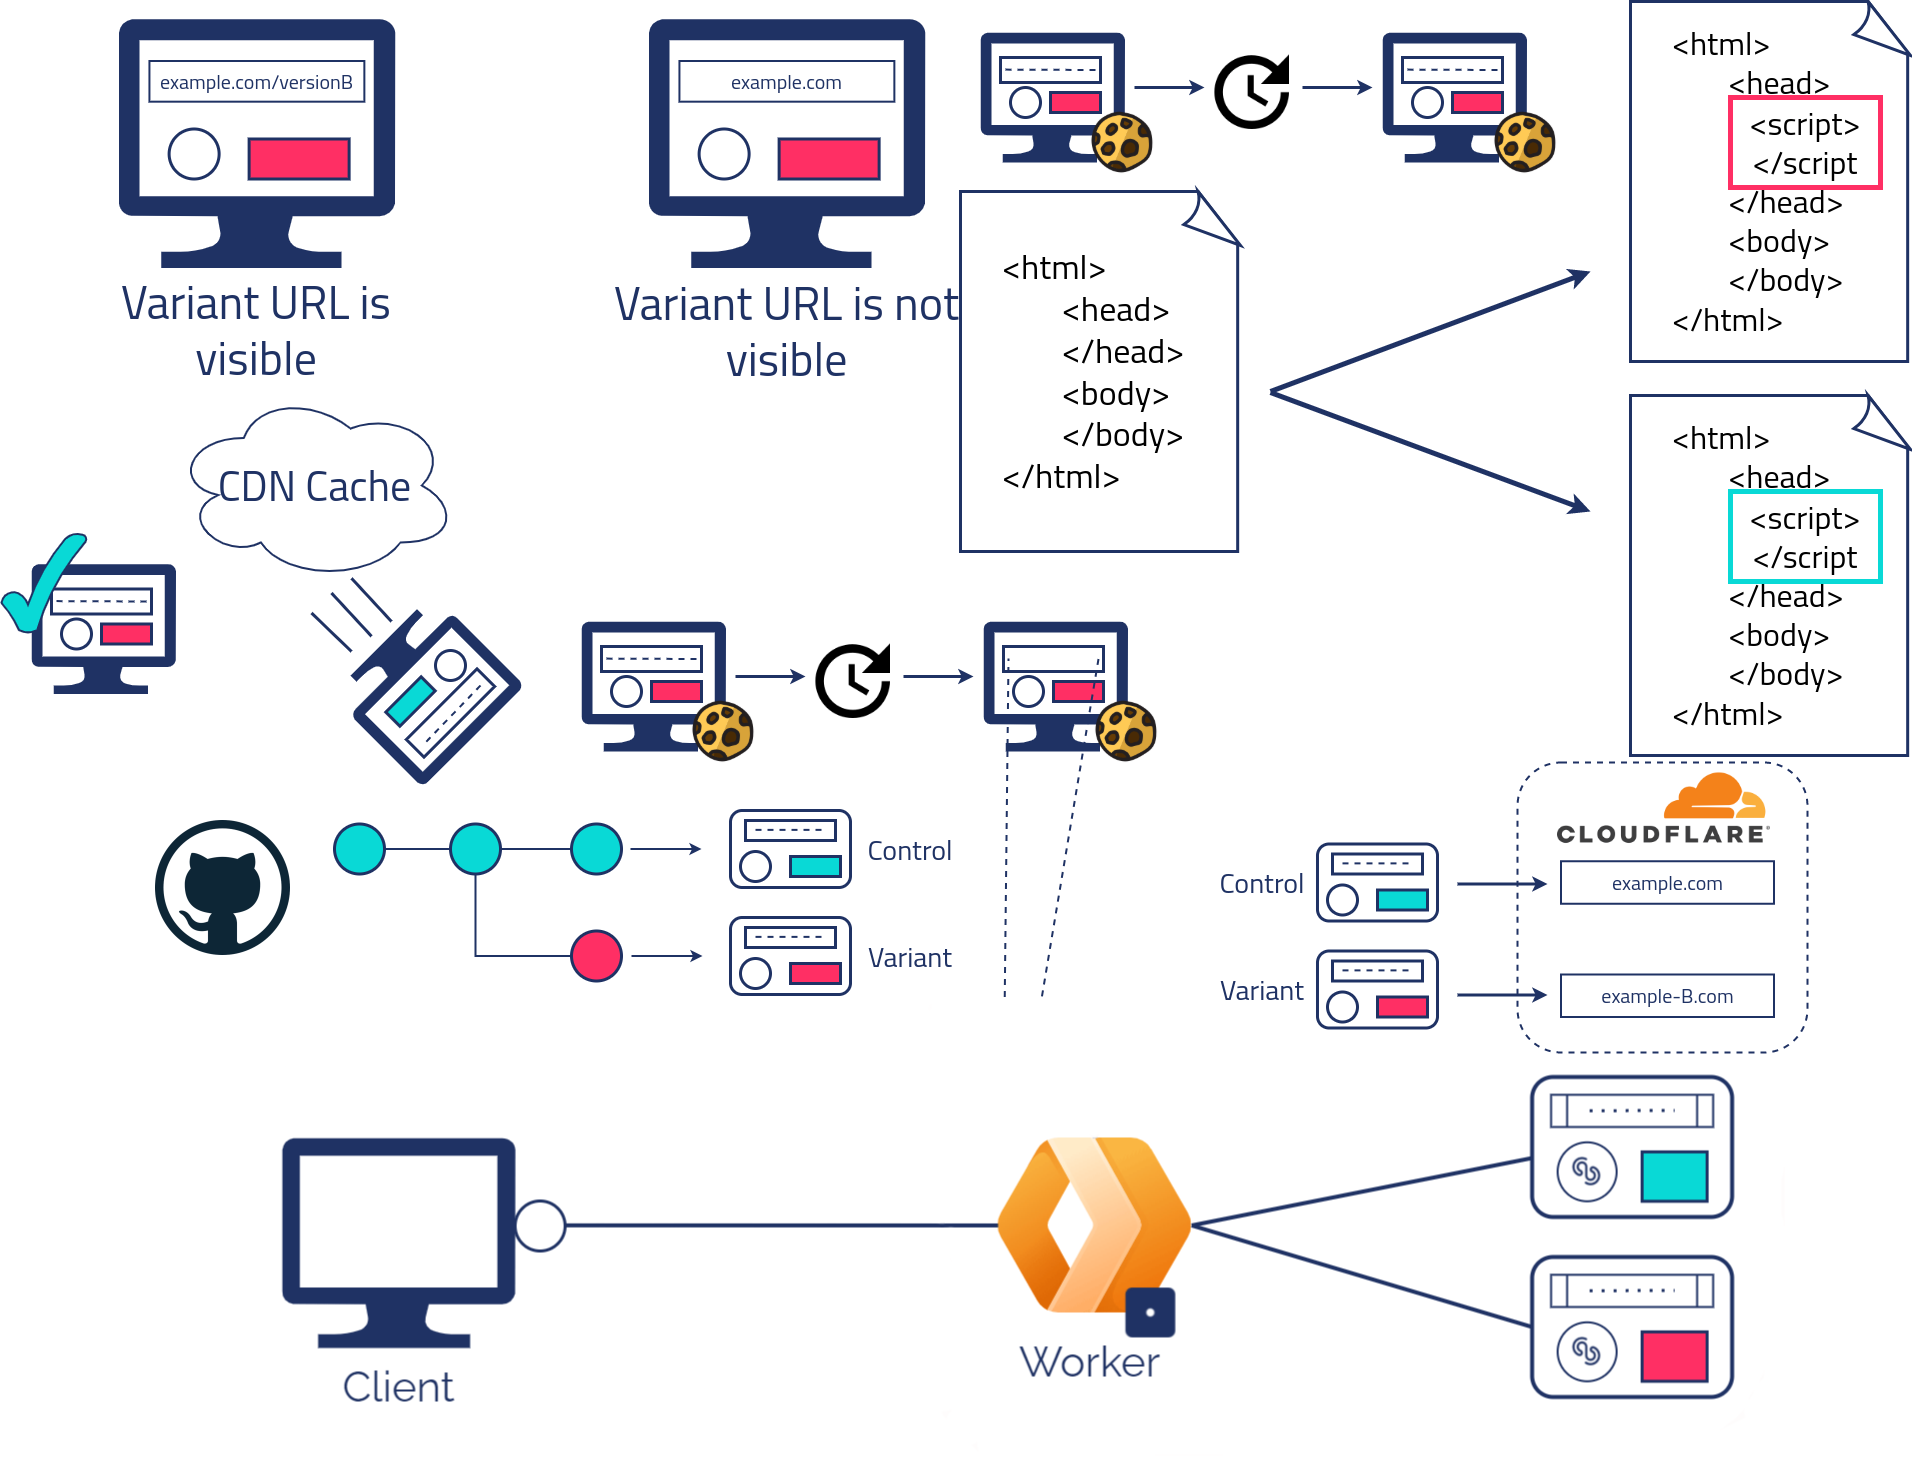
When the logic is on the client side, it’s quick and easy to set up A/B tests. However, this ease of use has a major downside: when a client makes a request, all the variants will be served in the response. This increases the volume of the data being sent, which can add to the page load time. Then, when all the variants have loaded into the browser, a Javascript routine must be called which hides every variant except the one the user is supposed to see.
This can cause the incorrect variant to flash onto the screen before being replaced by the correct one, (as shown in the middle picture). This is called the Flicker Effect of Flash of Original Content (FOOC), and it can make for a confusing or unpleasant experience for the user.
The effect can be corrected with a script that blocks all variants from being shown in the browser until it knows which one to render (as shown in the picture on the right).. However, this means the user may be looking at a blank screen for a couple of seconds before the chosen variant finally shows up.
In all of these cases, the increased amount of data to transfer and the expensive logic of switching between variants could cancel out some of the load-time reduction we’re hoping to get from using the Jamstack architecture.
A couple extra seconds of waiting for a page to load might not sound like a big deal, but it is. According to Google, the chance of a bounce increased by 32% when a page load time went from one to three seconds, and by 90% when the page load time went from one to five seconds.
Faced with all the disadvantages of client-side A/B testing for Jamstack applications, we must keep looking to see if there’s a better way to do it.
3.2 A/B Testing Using Edge-side Rendering
We’ve already talked about the benefits of caching and serving static content from CDNs.
As it turns out, most CDNs also offer another feature which opens up a whole new category of solutions to our problem.
Using a capability known as edge computing, we can actually write a program that executes every time our user’s HTTP request hits the CDN’s local server, and determines the response they will receive.
We can use edge computing to serve different versions of our content on a per-request basis, which is exactly what we need to do for A/B testing. With that in mind, let’s look at some ways to take advantage of Edge Computing to build an A/B testing solution.
3.3 Existing A/B testing solutions using edge compute
There are a few companies offering edge-side solutions to A/B testing right now, although as this is a fairly new area of A/B testing to explore, they are fewer in number than those offering client-side or server-side solutions.
We identified two broad categories of edge-side solutions based on how the variants are created and served: The HTML Rewrite solutions, and the Branch Based Solutions.
3.3.1 HTML Rewriting
The first option, the HTML Rewrite solutions, involve intercepting the payload of the client’s response and altering the body directly before forwarding it onto the client.
In theory, this could be used for A/B testing by keeping one version of the website in the CDN, and selectively rewriting variations into it as it’s being served to individual users.
We did some research on vendors offering solutions like this, such as Outsmartly. To use them for A/B testing, you don’t have to maintain multiple versions of your website.
Yet, developing this way presents other difficulties. You have to build your website from React components, which you register with the service to render differently for different variants of the site. We felt this might be practical for testing small changes, but not for testing out entirely different versions of the website.
It’s also not simple for developers to add this technology to their website, especially if they weren’t already developing it with this process in mind. It’s a complex and involved process, and in the end we put this type of solution aside to see if there was a better way for our use case.
3.3.2 Branch Based A/B Testing
So if we’re not rewriting HTML, that means we’ll have to find a way to keep multiple versions of our static markup files in the CDN’s cache, and choose which version to serve on a per-request basis.
Many CDN providers offer branch-based deployment for Jamstack applications, and it can be used for A/B testing. It works something like this:
You keep the code for your app in a git repository hosted on a platform like Github or BitBucket. When you’re ready to deploy, the CDN’s Jamstack hosting platform retrieves your code from the repository, and runs a build process, which generates the static assets of your app. If your repository has multiple branches, it will generate a bundle of static assets for each branch.
Once the assets are built, the CDN replicates them in all the nodes of its global network and exposes a url for each bundle of assets.
Finally, now that the assets are built, every time someone navigates to your domain you can use the CDN’s edge compute platform to choose which assets to serve back to the client.

We classified this as Branch-Based A/B Testing, and decided that it fit our use case well. In addition, Jamstack developers are generally already accustomed to deploying with a Git flow, so Branch-based A/B testing would be an extension of how they are already working.
3.4 Exisiting Branch Based A/B Testing Solutions
Let’s look at a few of the options for branch-based A/B testing that are currently available in the marketplace.
3.4.1 Netlify
Netlify is a CDN that offers an out-of-the-box split-testing feature at the edge. If you host your Jamstack application on Netlify, you can take advantage of this feature to split traffic among apps built on multiple branches of your Git repository.
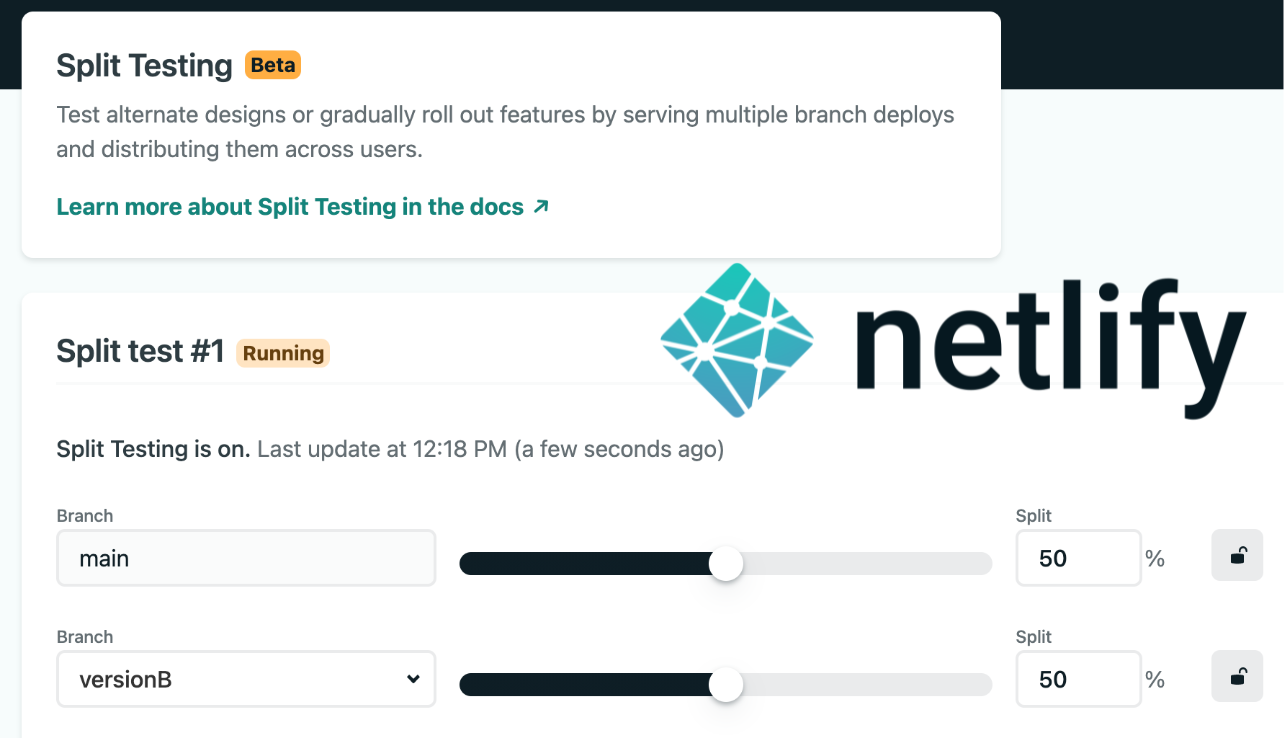
This feature is quick and easy to set up. However, it doesn’t offer control over how your traffic is segmented, only how much of your traffic is segmented. In other words, you can direct ten, twenty or thirty percent of your traffic to the test version of your site, but you can’t decide to test, for example, only mobile device users, or only users who are using a particular browser, which is something you may want to do.
Also, Netlify does not offer a built-in analytics solution.
3.4.2 Layer0
Layer0 is another CDN boasting Branch-based A/B testing at the edge. They also have a split-test feature that is similar to Netlify’s, but it allows you to split traffic based on cookie, header, browser or device. However, like Netlify, it does not offer a built-in analytics solution.
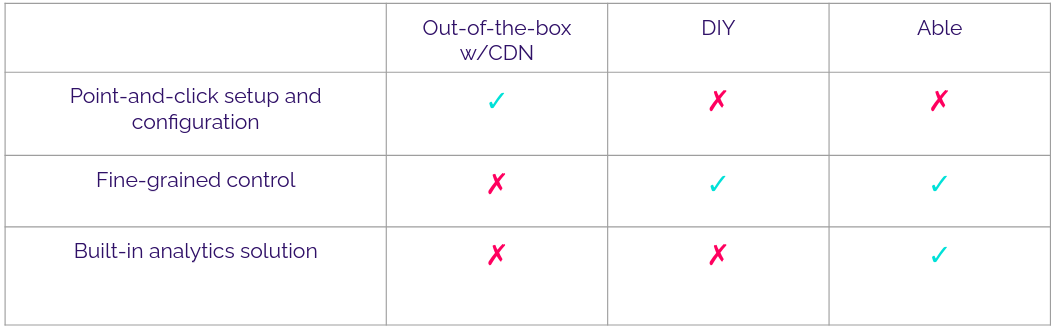
3.4.3 Summary
So to recap, the out-of-the-box A/B testing solutions offered by CDNs are easy to use, but they may or may not offer the kind of control you want over your tests, and they don’t offer adequate analytics solutions.
As an alternative to these options, it might be worth it to consider a do-it-yourself solution. You’d need to host your Jamstack application on a CDN that offers both branch-based deployment and a robust edge compute platform with complete control over the HTTP request/response cycle at the network edge, such as Cloudflare, or AWS.
This would give you as much control as you could ever want over the A/B testing process, however you’d still have to come up with your own analytics solution.
3.5 DIY Branch Based A/B Testing
Let’s talk about the steps involved in setting up a DIY solution for A/B testing your Jamstack application:
First of all, you have to create your variants manually on different Git branches.
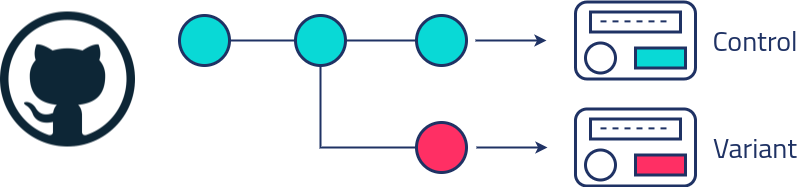
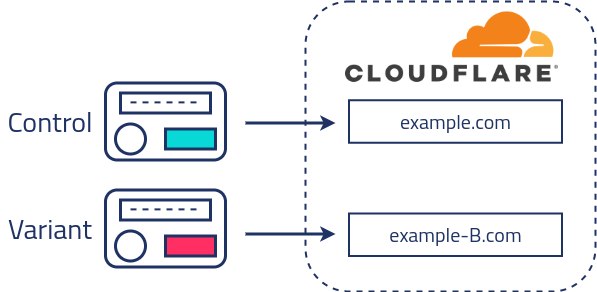
Then, you’ll deploy them to your Cloud provider of choice. This will give you a distinct URL for each version of your application.
When a client sends an HTTP request to the URL that identifies your webpage, you’ll have to provision a serverless function to intercept that request and inspect whether or not the user should be included in the test.
If they should, the serverless function will need to assign users randomly to groups. This means that the first time a person visits a website undergoing a test, a routine should be called that picks from among the available variants, and the client should be served that variant.
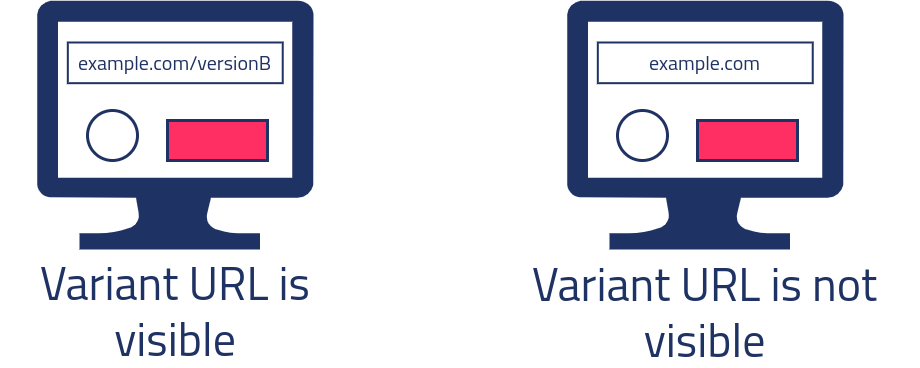
You might think that would be as simple as having the serverless compute function send a redirect response, instructing the browser to request the chosen variant from a different url. However, this would result in that different url being displayed in the browser’s address bar. This is not good, because it’s not the address they navigated to. We want the test to be invisible to the user. That means they should not see a different url in the address bar than they expect to see. This means that the serverless function can’t simply send a redirect response. It must be written to fetch and deliver the correct resource using only the information contained in the HTTP request, and it must accomplish this in one request/response cycle.
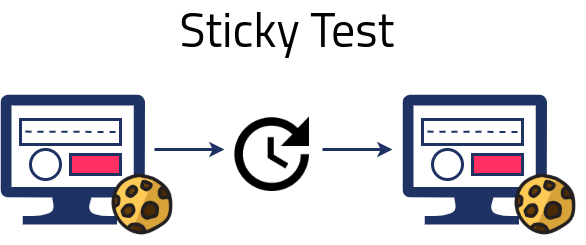
The tests also should generally be “sticky.” This means once a user has visited the site, they should be served the same variant of the site on all subsequent visits.
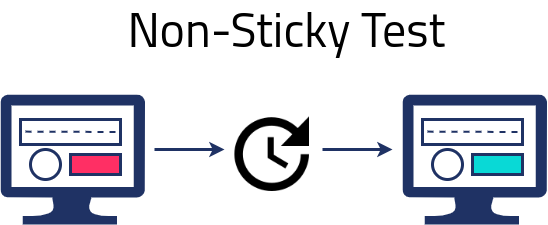
To do this, you would have to set a cookie to track which group users belong to. Additionally, you’ll have to monitor user behavior and track metrics for each of your variants.
There are many analytics tools available, but choosing the best one to use and setting up the tracking process may also be challenging.
In order to monitor user behavior, most analytics tools provide a tracking script that needs to be inserted into every page that needs to be tracked. This may require editing every page of Html you’re planning to serve.
Perhaps the most important thing to track is which metrics belong to which variant. This may mean setting up two or more separate tracking scripts that need to send their data to the same place.
Also, if you’d like to respect user privacy by maintaining full ownership and control over the data you’re collecting, you may opt to host your own analytics using an open-source tool. This would require you to provision and manage additional infrastructure.
Finally, once you’ve identified the variant that meets your performance goals, you’ll have to roll back the test, deploy your winner and invalidate all the caches containing your test variants.

While this process is doable, it requires a lot of steps and a solid understanding of how to use serverless compute options. Because it’s highly involved, it also makes it difficult to update tests once they’re in process, and if you want to iteratively test to find the most optimal version of your application, you’ll have to walk through this process again and again and again.
4. Building Able
This is why we created Able, which we believe occupies a middle ground between the very difficult but powerful DIY solution, and the very easy but limited out-of-the-box solutions provided by CDN companies like Netlify and Layer0.
Able automates the process of setting up branch based A/B tests on Cloudflare. It does a lot of the things you’d have to figure out for yourself if you were trying to do a DIY solution. It offers fine-grained control over the A/B testing process. It also automates provisioning infrastructure for your own instance of Umami, a powerful open-source analytics tool.
What it doesn’t have right now is a configuration dashboard, so it takes a little bit more effort to set up. You have to manually edit a json file to supply Able with the configuration data. However, developers may be willing to make that tradeoff in exchange for the other benefits it offers.
Now that we’ve seen where Able fits in with the picture of existing solutions, we’ll take a closer look at what Able does and how our team built it.
4.1 Overview
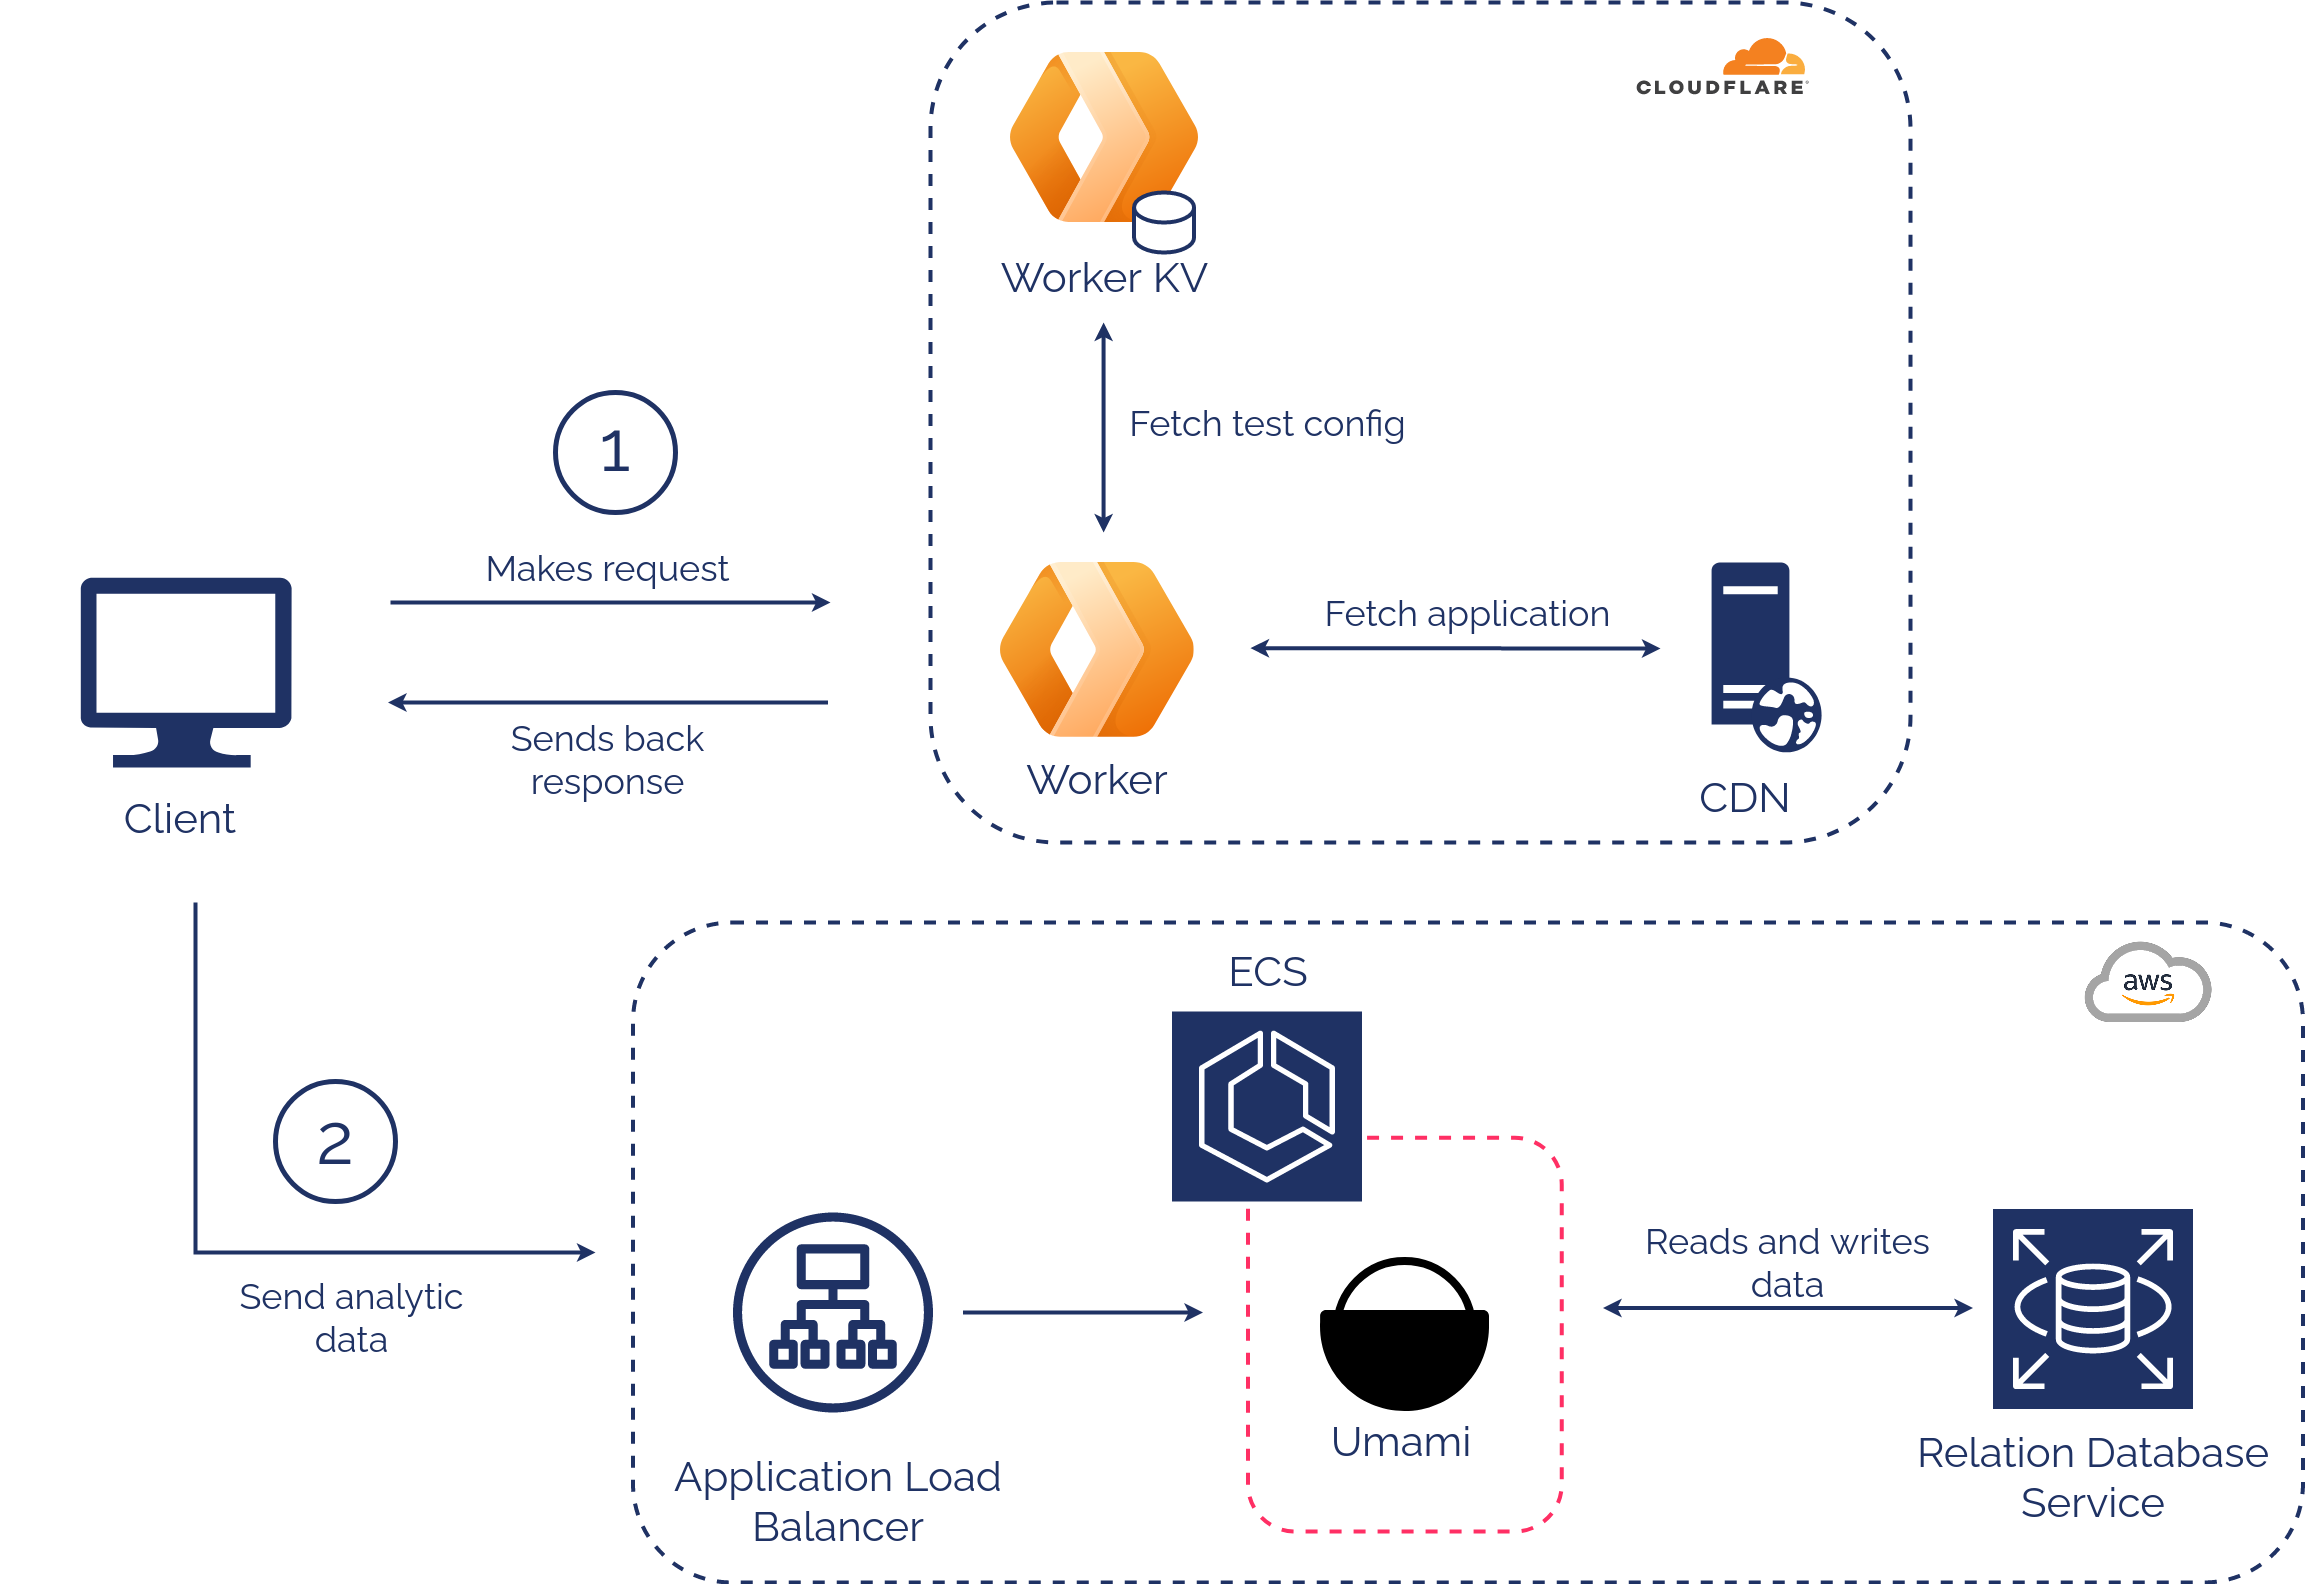
Able’s architecture can be broken into two main parts: the Cloudflare component responsible for controlling the A/B tests and the Umami and AWS infrastructure used for tracking the metrics.
The Cloudflare component runs the A/B test.
This is where the variants are hosted, and all of the logic for the A/B test runs in a serverless function in Cloudflare’s CDN, called a Cloudflare worker. The configuration data for the A/B test is stored in a Cloudflare KV. We’ll explore how these two pieces work together shortly.
The other half of Able’s architecture is responsible for processing and storing all of the analytics data during the test. We wanted to provide an option to easily self-host analytics, so we decided to use an open-source analytics tool called Umami. However, to actually run Umami we needed two things: a server for the analytics engine to run on and a database to store the data. We opted to spin up this infrastructure on AWS.
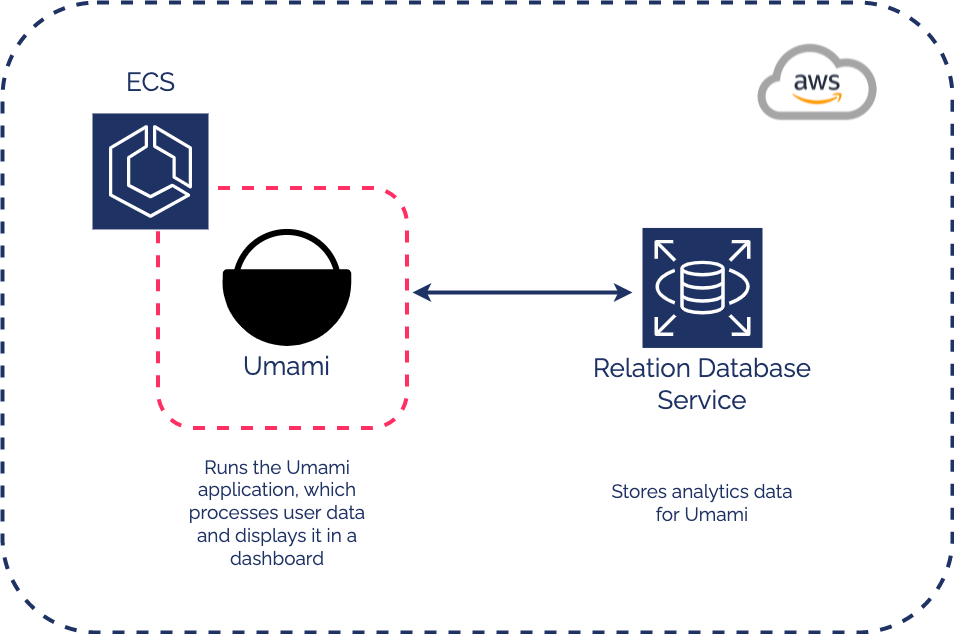
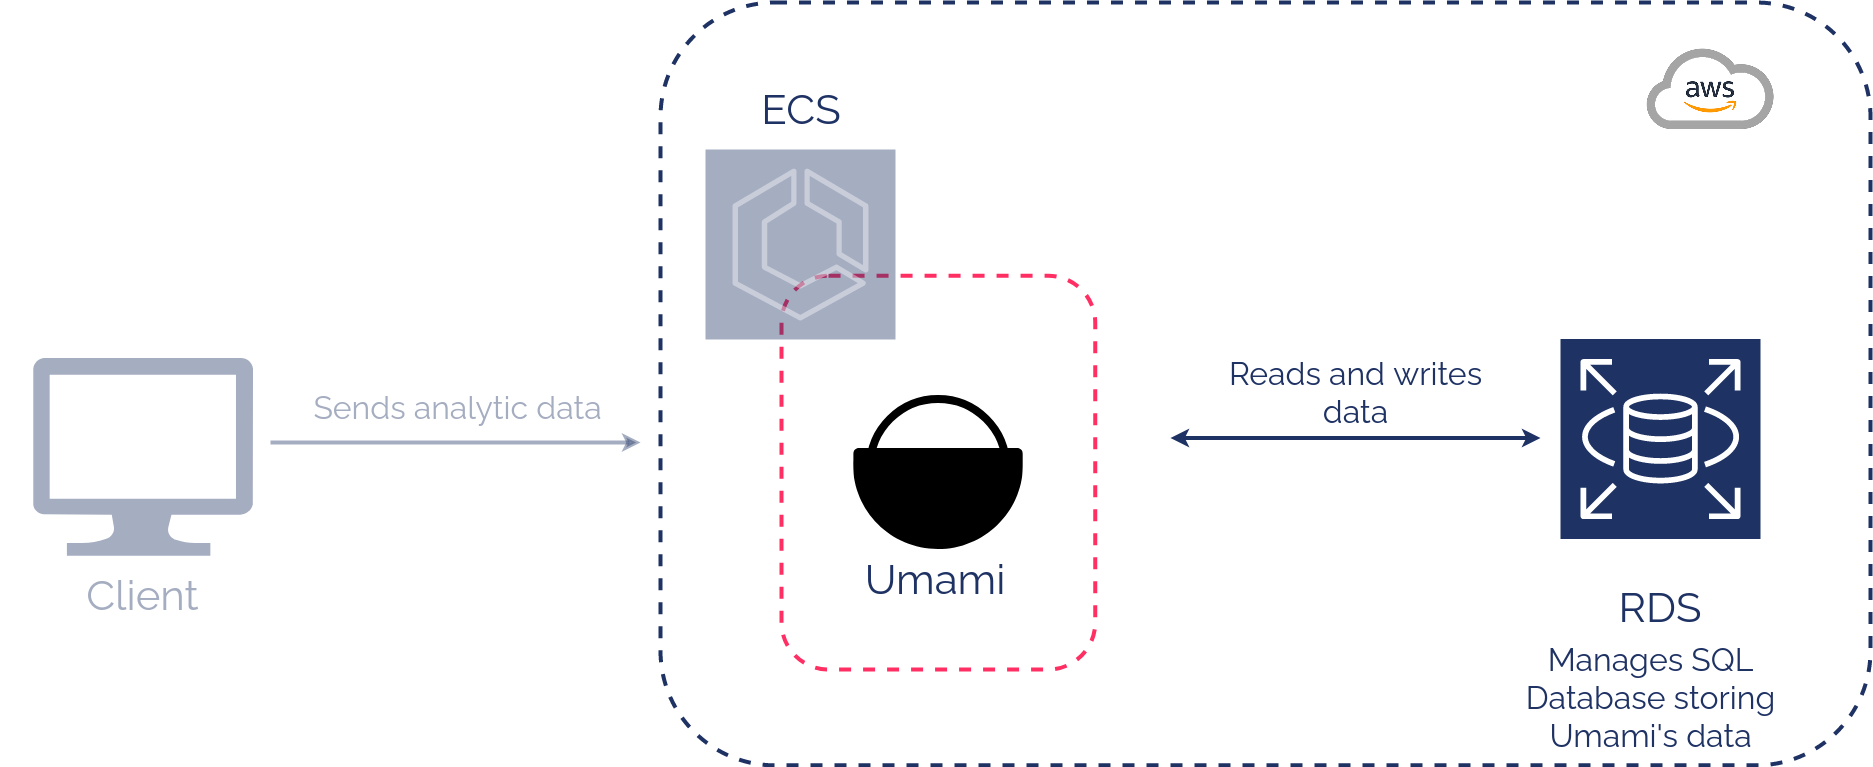
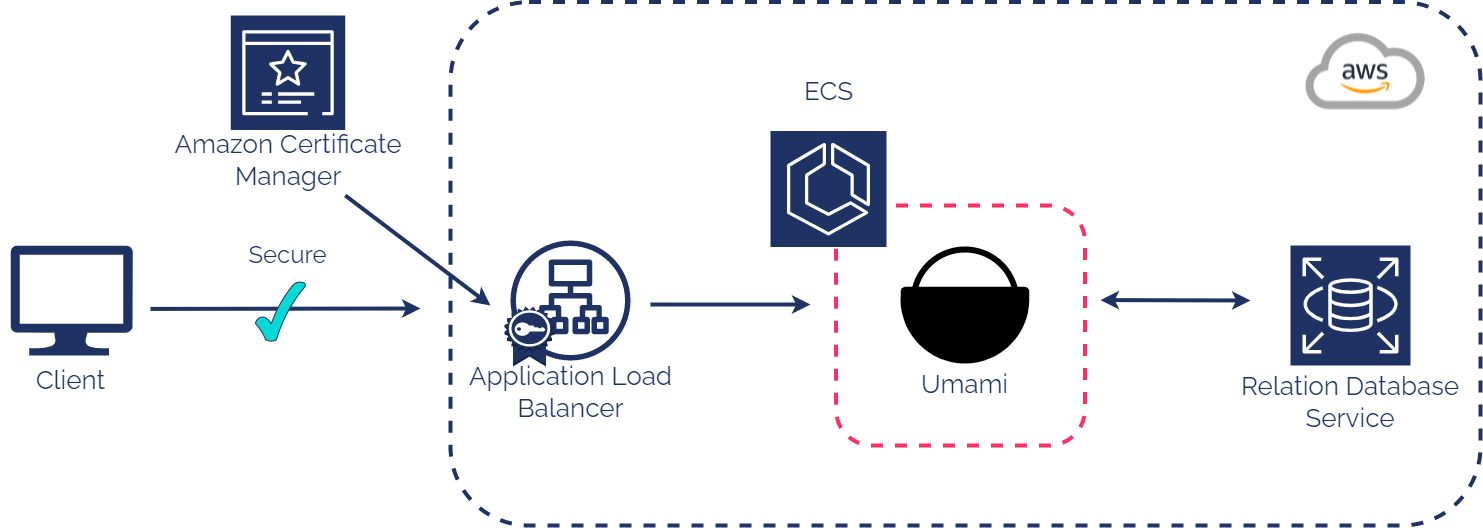
With Umami analytics up and running, when a user visits the site, information about their actions will be sent to AWS where it will be processed by the Umami application running in an ECS container and stored in a RDS database. All of this data will be displayed in the ableUmami dashboard.
At this point, we’re going to zoom in on Able’s architecture a bit, first the Cloudflare portion, and then the AWS-Umami portion.
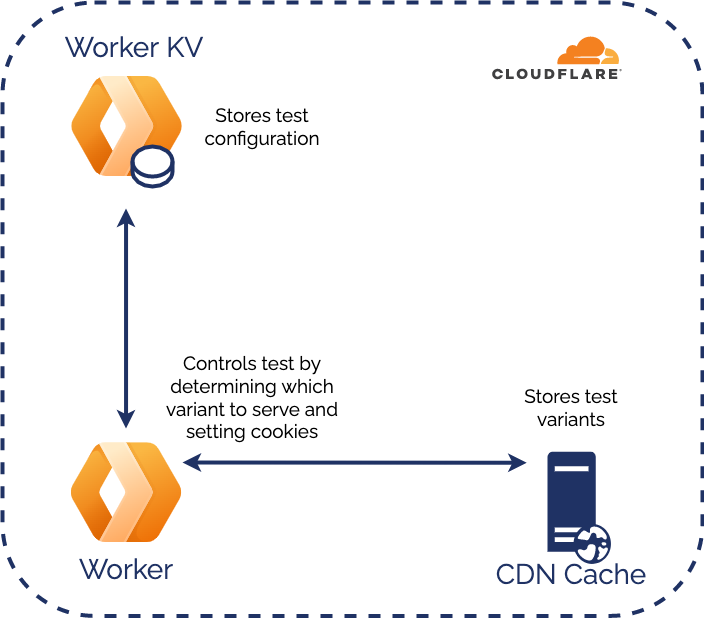
4.2 Cloudflare
The Cloudflare architecture consists of two main parts: a Cloudflare Worker and a Cloudflare Worker KV.
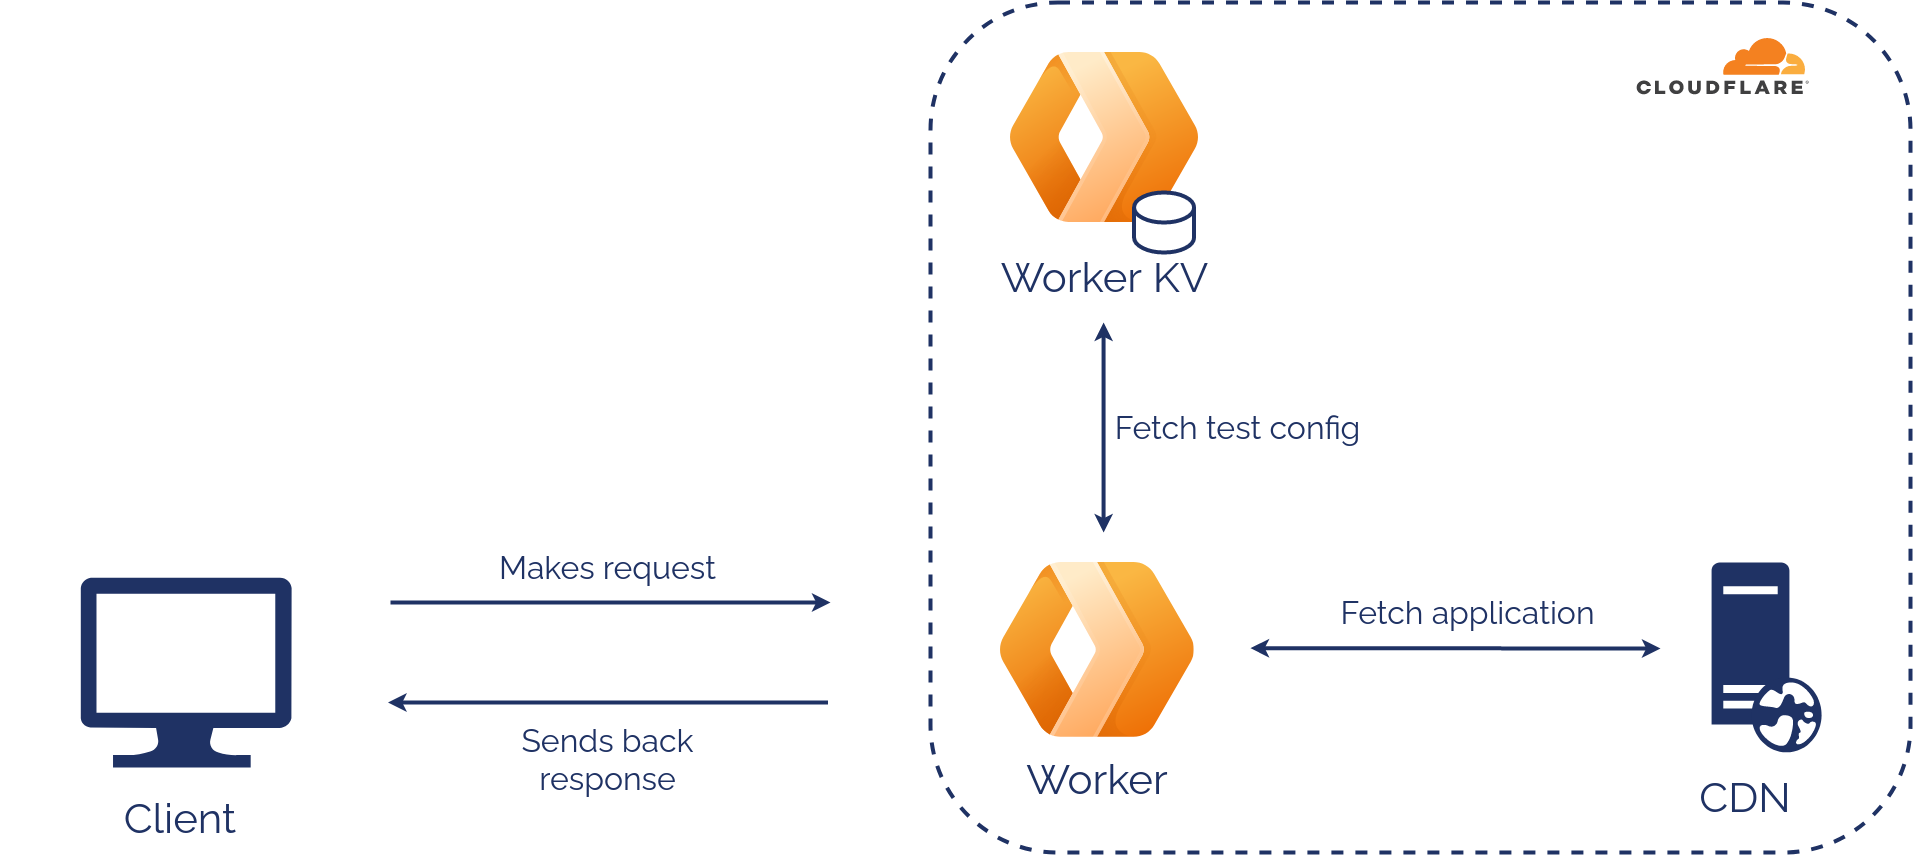
The Cloudflare Worker is a serverless function. You can think of a serverless function as a function that can be executed at the edge of the network. This function runs every time a user visits the page and controls which version of the app a user is served. The worker also sets the cookie, ensuring the user will always be served the same variant.
When we deployed our first Cloudflare Worker to perform an A/B test between two branches, all information regarding the A/B test was hard coded in the Cloudflare Worker. This meant whenever we wanted to make a change to our test we would have to redeploy our Cloudflare Worker every time.

We decided to place the configuration of the A/B test in a Worker KV. A KV is a type of data store that only stores key-value pairs. The Cloudflare Worker KV is really interesting because it’s distributed across Cloudflare’s global edge. By storing the configuration data in the Worker KV, we can make changes to our A/B test without having to redeploy workers. And since the Worker KV is globally distributed and available throughout Cloudflare’s CDN, the additional latency to fetch the configuration data is minimal.
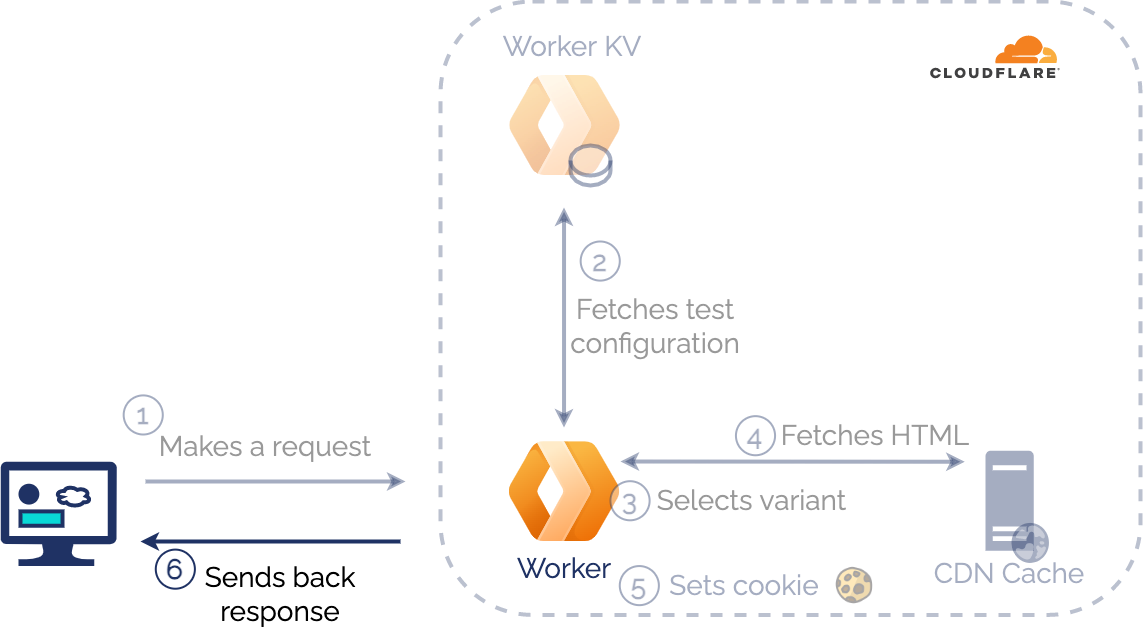
4.2.1 Cloudflare in Action
So, let’s take a look at this in action.
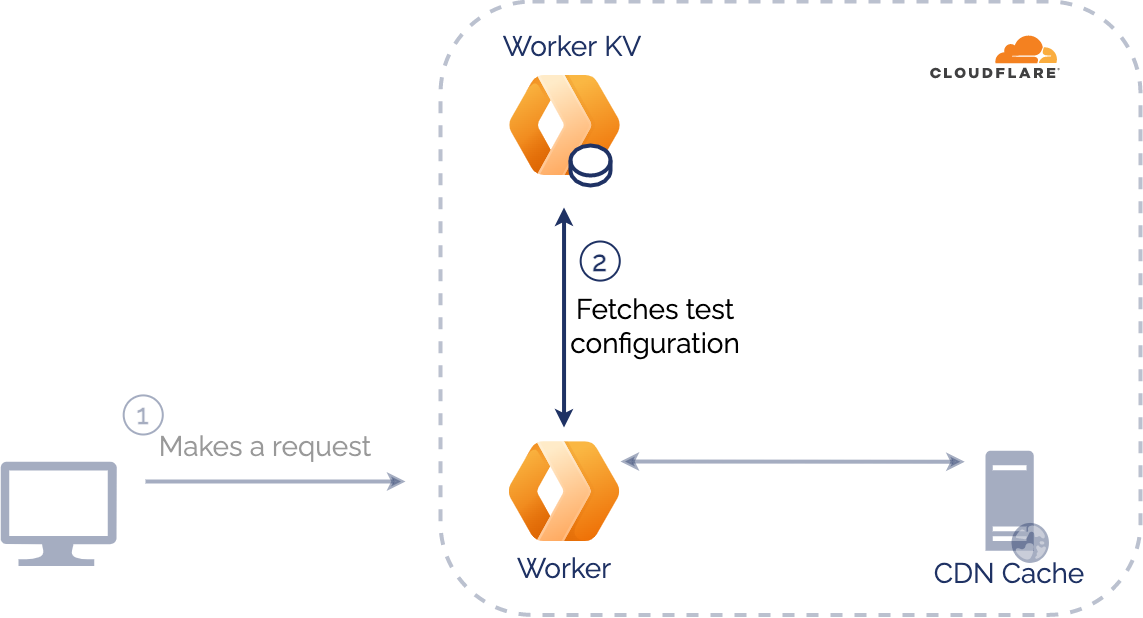
When a user types your domain name into their browser, a request will be sent to a DNS server, which will in turn be routed to the Cloudflare CDN closest to the user.
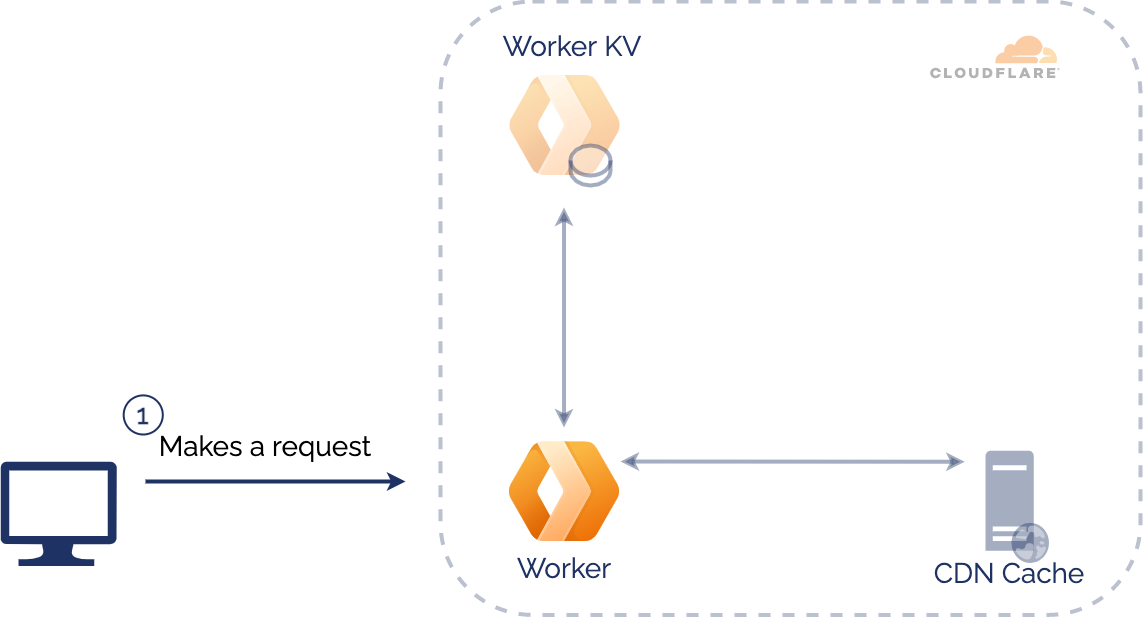
At the CDN, the request will be intercepted by the Cloudflare worker.
The worker will first get the configuration data for the test from the Worker KV where it’s stored. This includes information about split ratio, traffic segmentation, etc.
The worker will then check to see if the request includes an Able cookie. The cookie determines if a user is part of the control group or the test group.
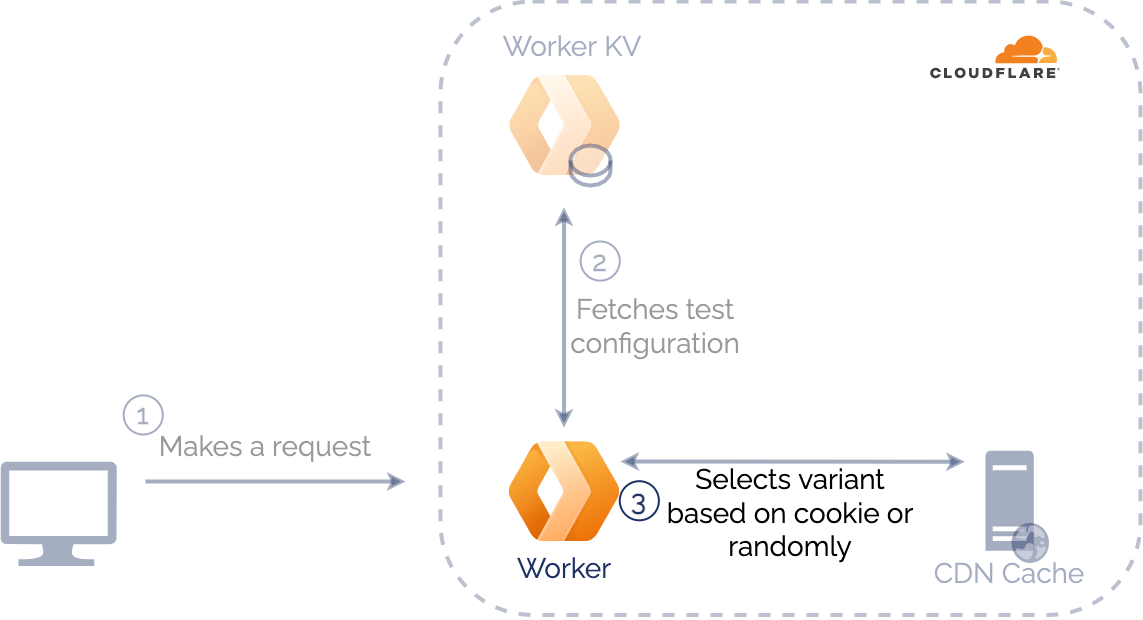
If the user hasn’t visited the site before, they won’t have a cookie. The worker will check to see if they should be included in the test, and if they should, will roll the dice and set the cookie based on the outcome.
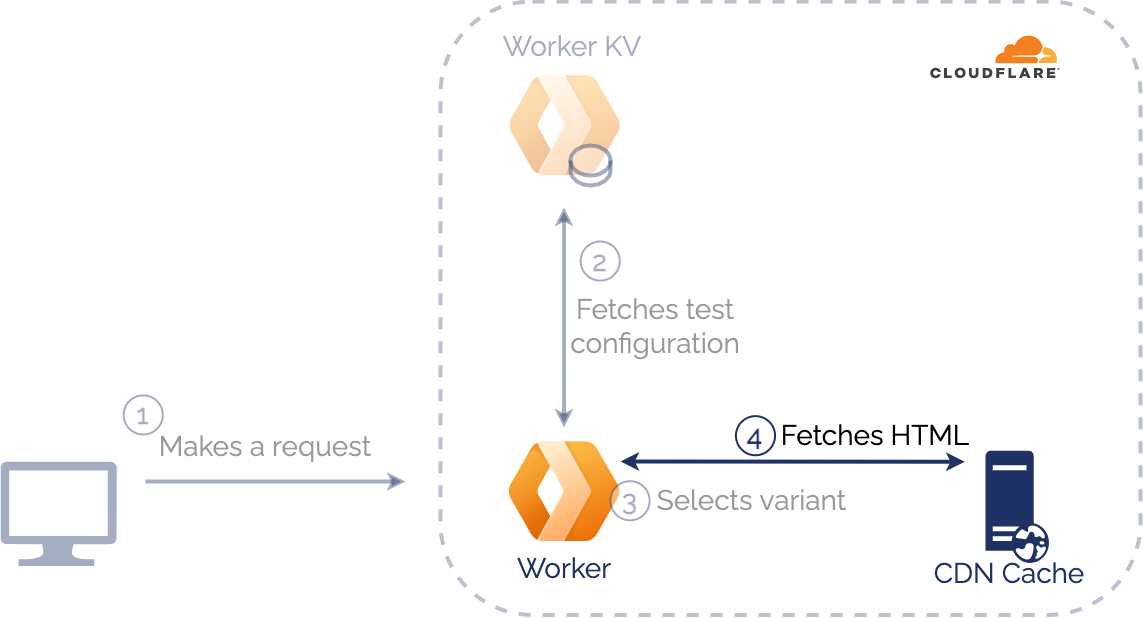
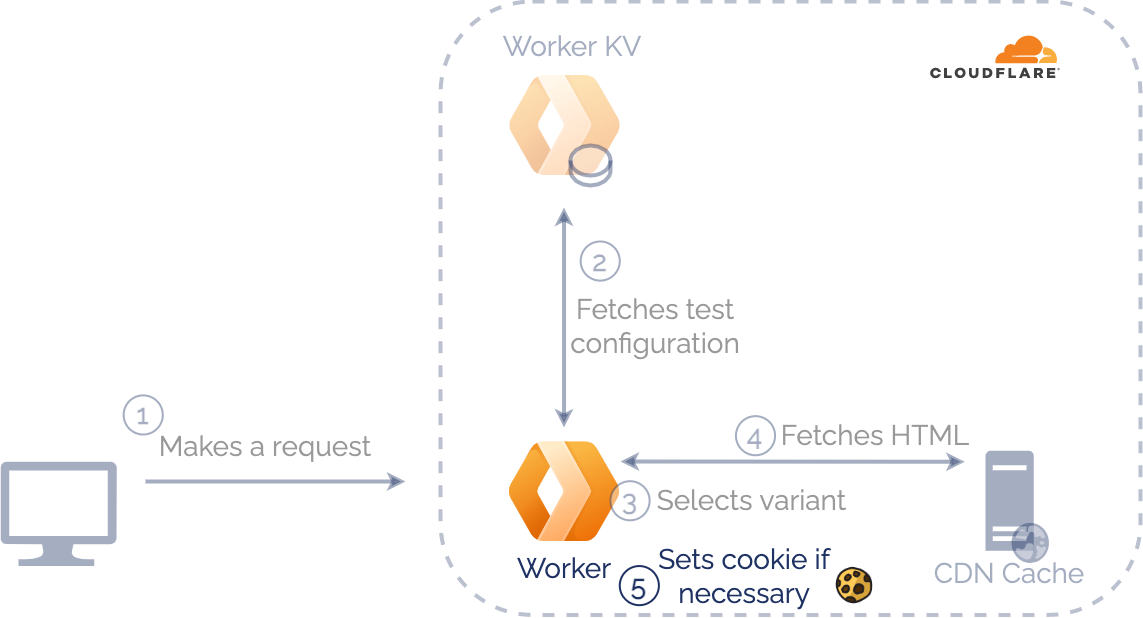
It will then retrieve the appropriate variant and serve it to the user. If the user refreshes the page or returns another day, they’ll see the same version of your site, and won’t realize they’re part of an experiment.
4.3 AWS
That leads us to the second half of Able’s architecture: the Umami architecture running on AWS.
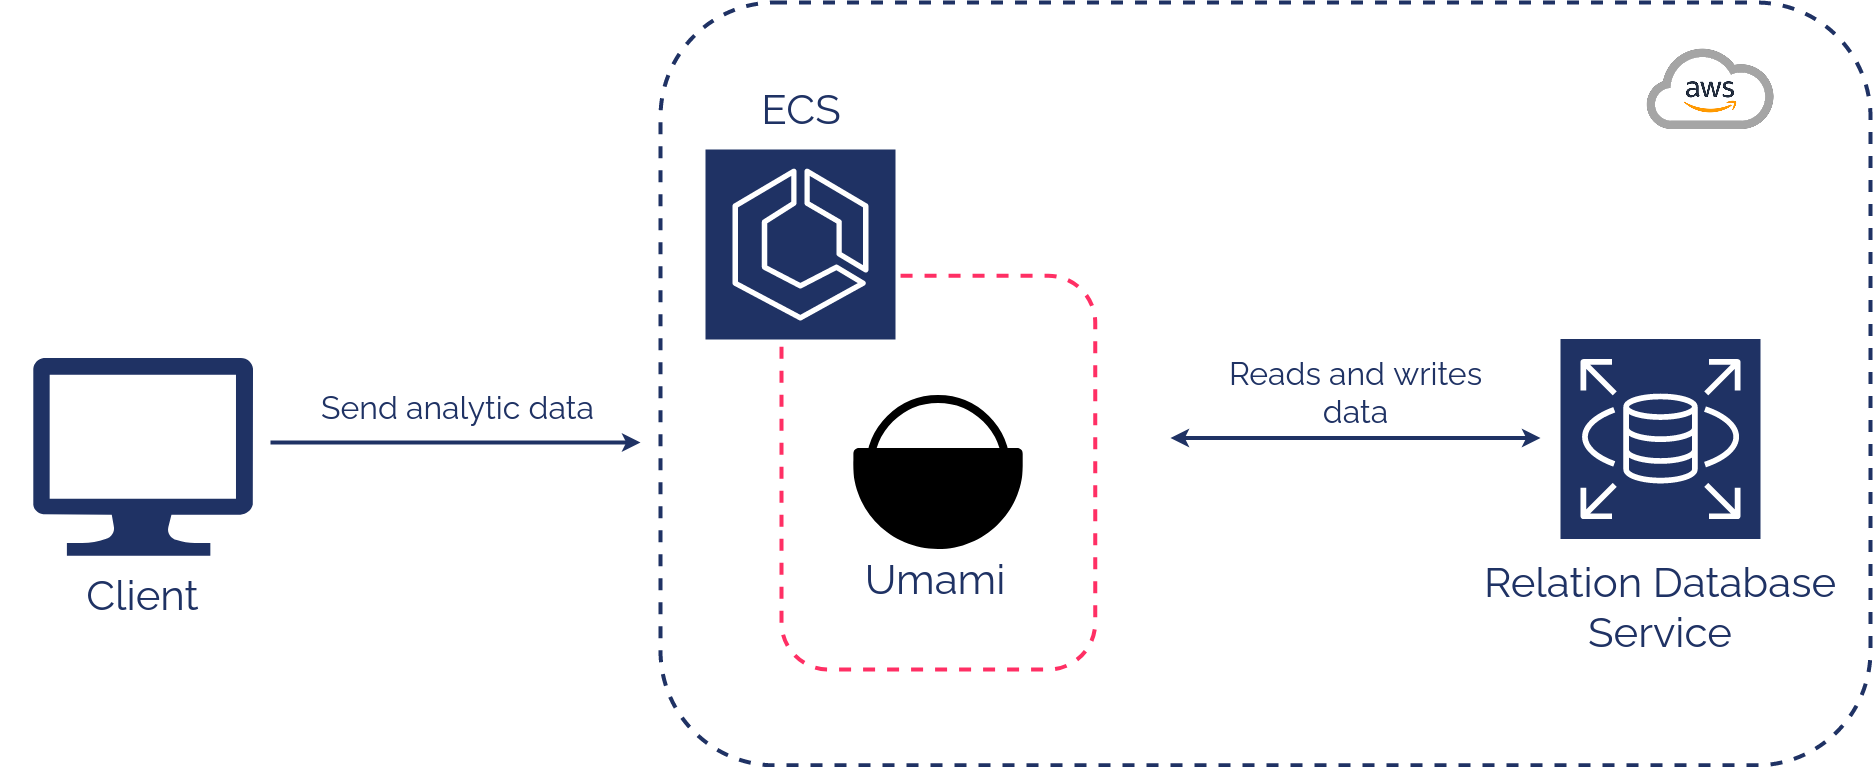
Umami also consists of two parts: a database to store all of the data Umami collects and an application to process this data and display it in a dashboard.
The application component of Umami runs in a Docker container managed by Amazon Elastic Container Service, or ECS.
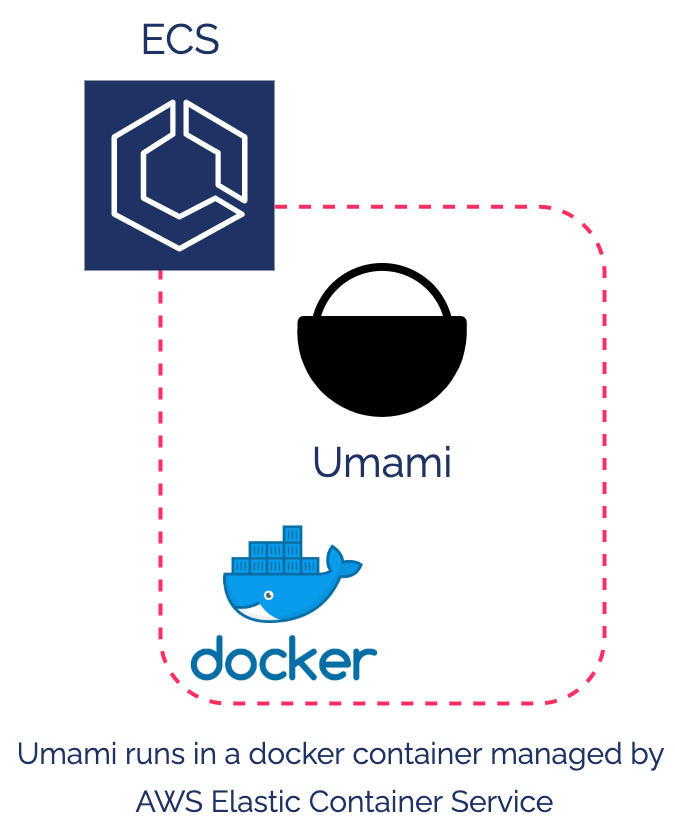
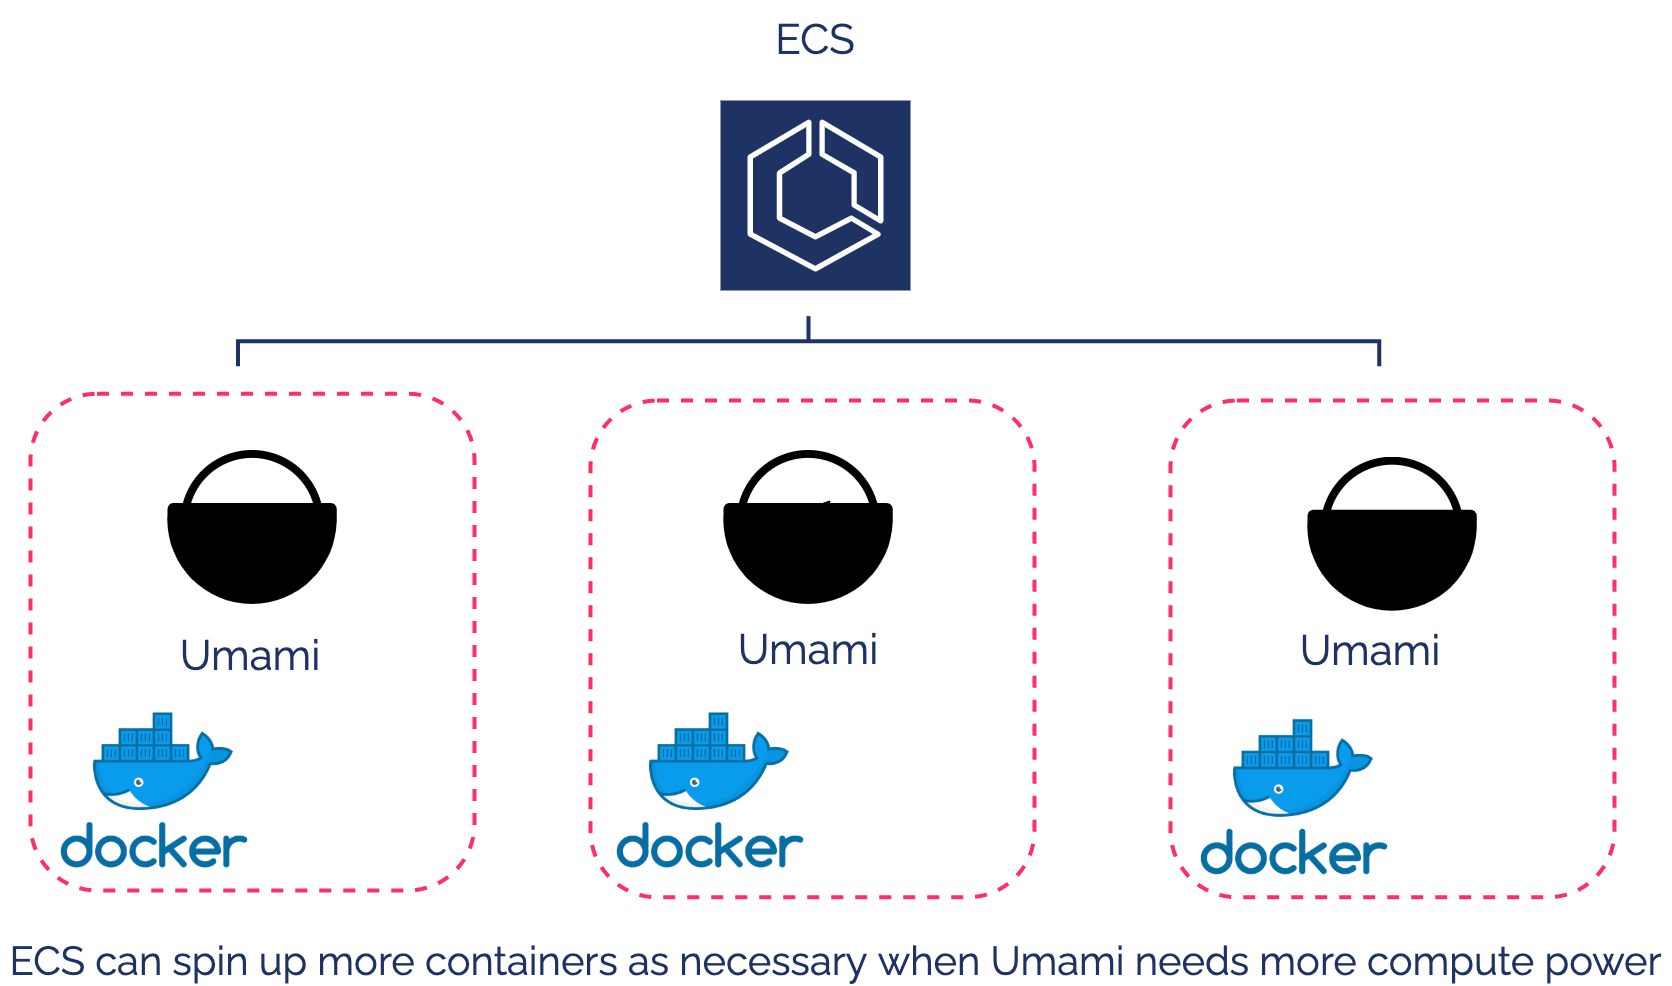
Using a Docker image means we don’t have to manually install and run Umami on an EC2, or Elastic Compute Cloud, instance and can instead use ECS. ECS is a container orchestration service that makes it easy to run, stop and manage Docker containers. We configured it to scale up if our Umami application gets a spike in traffic and needs more compute power.
To store Umami’s data, Able uses Amazon’s Relational Database Service, or RDS. RDS is a managed SQL database service that abstracts away the complexities associated with running and maintaining a database. Amazon has other options for persistent storage, but we chose RDS because we wanted our users to focus on the data collected by our application instead of worrying about the configuration, management and maintenance of a database.
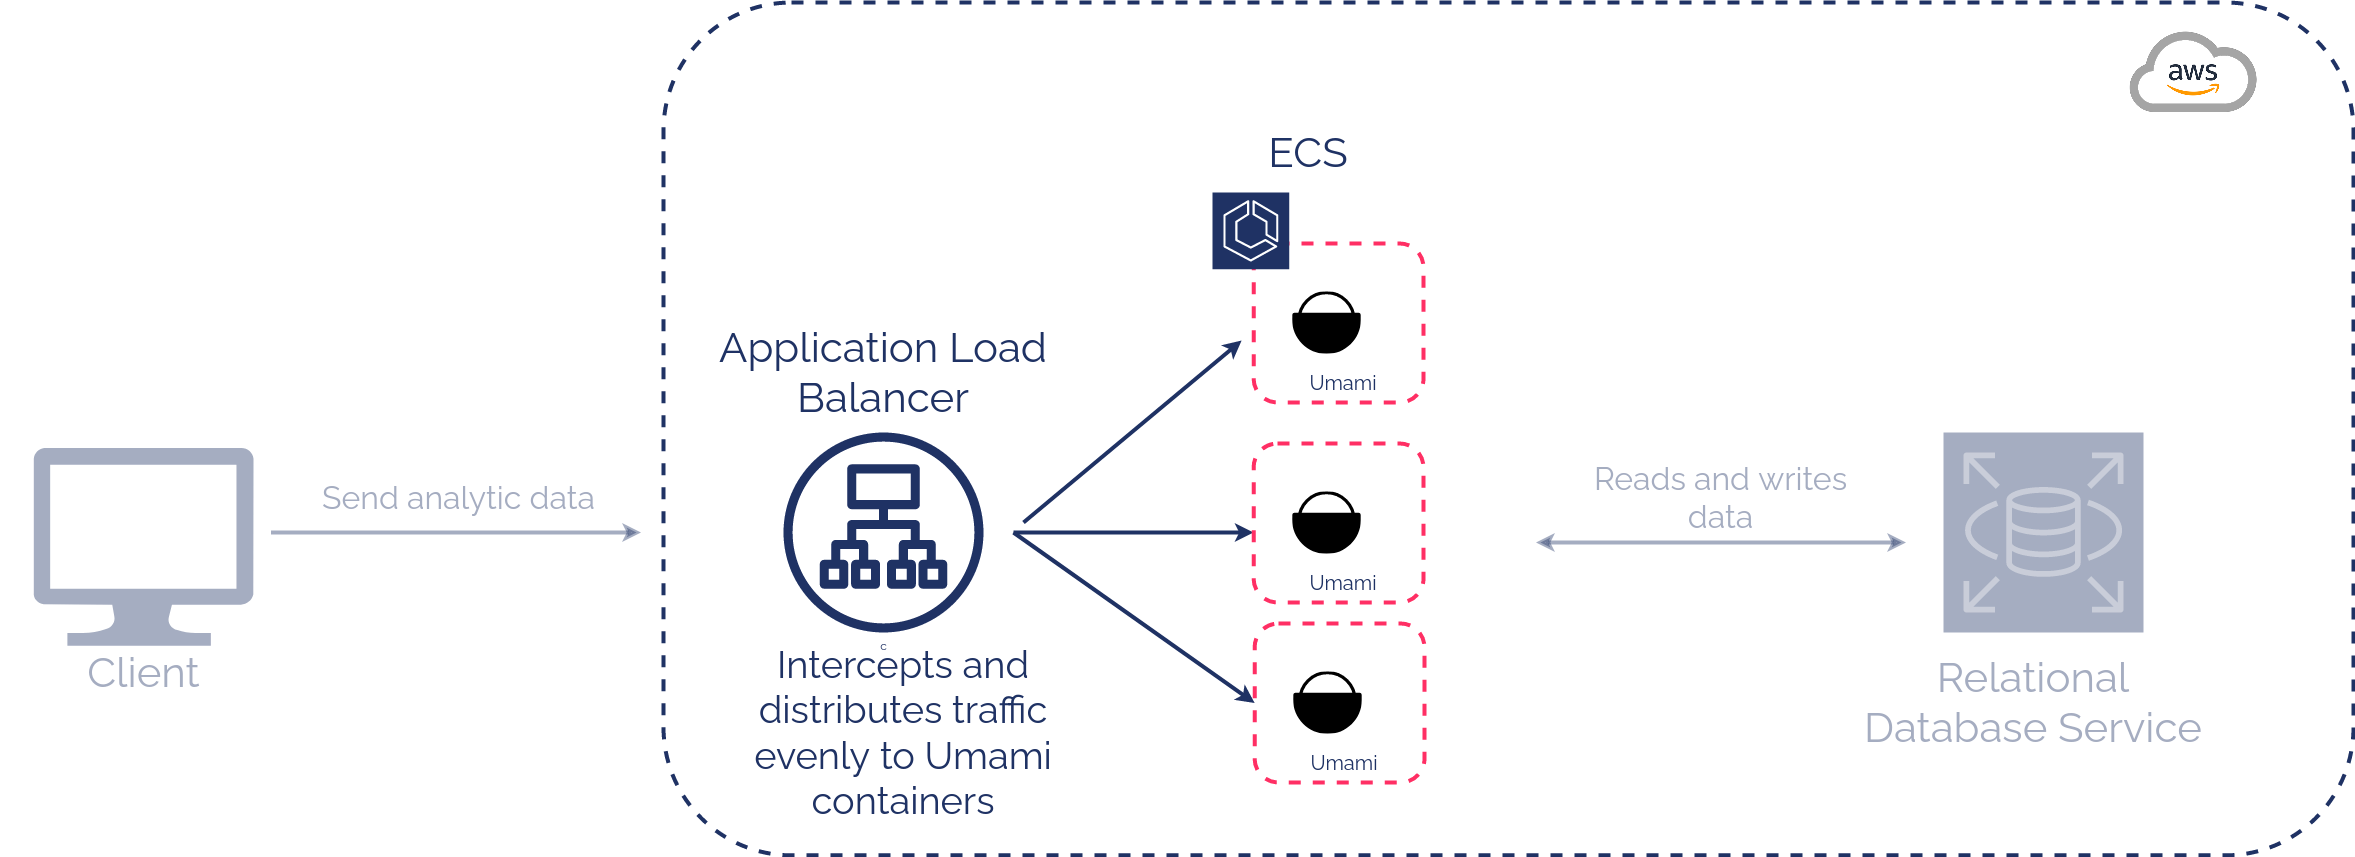
The final part of the Able’s AWS architecture is an Application Load Balancer. The Application Load Balancer sits in between the client and the container service Umami is running in. Remember, if Umami starts receiving a lot of data and needs more compute power to keep up, ECS will automatically spin up more containers to keep up. The Application Load Balancer will make sure the traffic is evenly distributed to the containers.
We automated the creation of this infrastructure using AWS’s Cloud Development Kit, or CDK.
4.3.1 Umami in Action
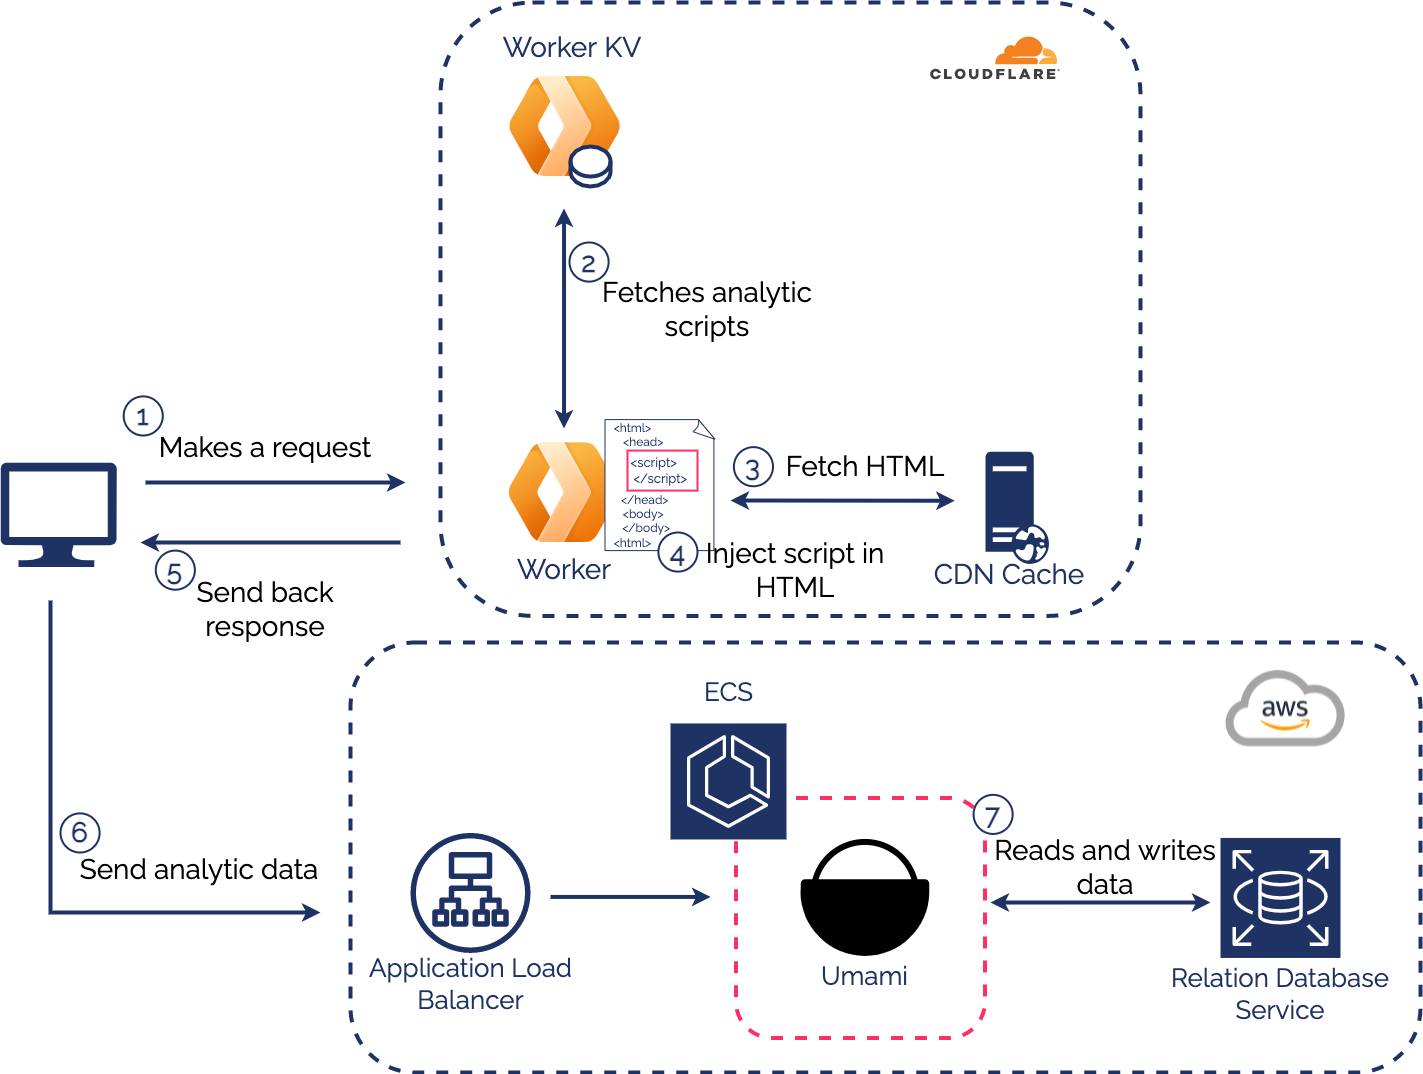
Now that we know the components that comprise Umami’s infrastructure, let’s briefly walk through the flow of how the analytics portion of Able works.
When a user requests a page, the corresponding tracking script is injected into the HTML by the Cloudflare Worker . As they interact with the page, data about their interactions is sent to the Umami infrastructure running on AWS.
A load balancer intercepts the data and directs it to a container where Umami is running. Umami will process this data and display it on a dashboard. The data will be stored in an RDS database.
4.4 Reviewing Able's Architecture
Let’s do a quick recap of Able’s Architecture that we just covered.
A client makes a request to visit your site. The request is then handled at the Edge by a cloudflare worker.
The cloudflare worker fetches the configuration of the A/B test from the Cloudflare Worker KV and determines whether the request will participate in the A/B test.
If so, the Worker will decide what variant and analytic script tag to send back as well as a cookie to ensure the client will always see the same version of your site.
Then the client will send data to Umami Analytics, where you will be able to view how well each variant performed in real time on your Umami Dashboard.
5. Challenges
We encountered two significant technical challenges while building Able. One challenge was adding analytics to each site cached at the CDN and the other challenge was automating the process of enabling HTTPS.
5.1 Adding Analytics to Each Site Cached at the CDN
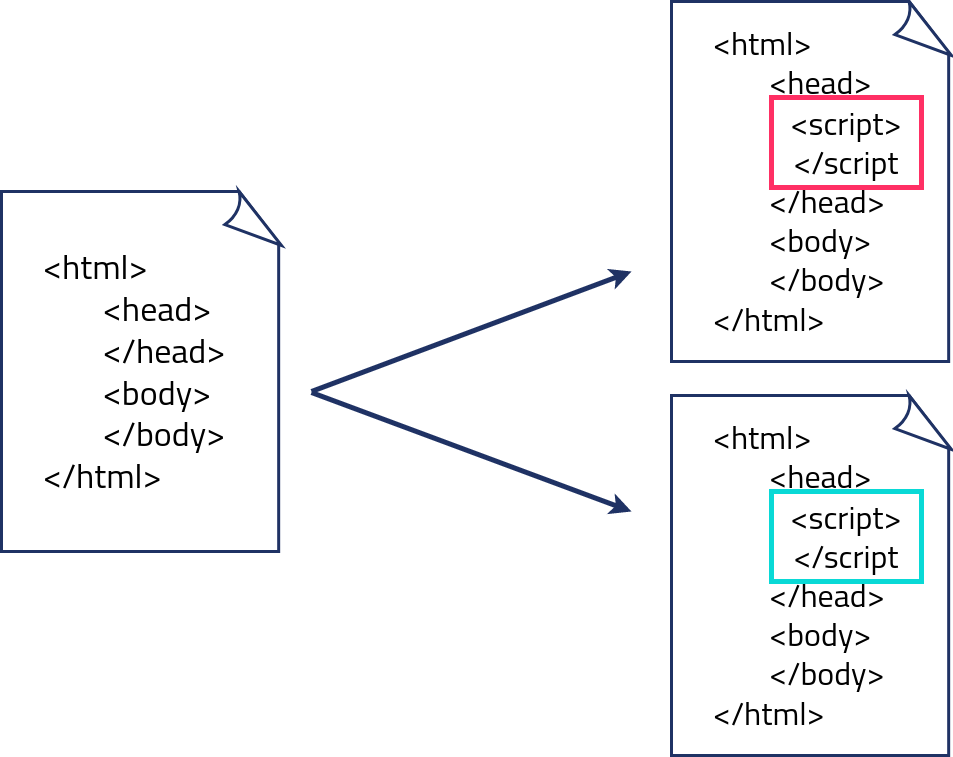
Most client-side analytic tools, including Umami, track user behavior with a Javascript script tag. This script tag is essentially a callback function that is executed when a user visits the page, which sends information about the user’s session back to the analytic software. This is a common way for how analytic tools work. So how would a developer differentiate the data from one variant of their site to another during an A/B test?
In order for the developer to differentiate the data from one variant of their site to another they would have to make sure each variant of the site has their own separate script tag written into the HTML.This way they can keep track of which variant is performing the best.
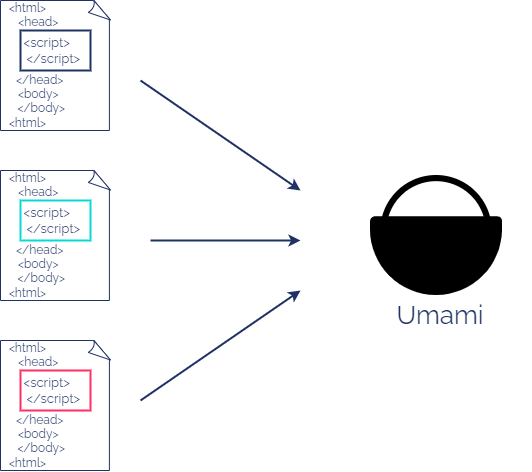
5.1.1 Inserting Analytics for each site
There are two ways a developer could insert separate analytic script tags for each variant of their site. They could manually go through each variant of their site and insert the script tags in the HTML themselves or provide the script tags to the A/B testing tool which would handle the rest.
With Able we wanted to provide a service where a developer could provide their analytic script tags and Able would insert the script tags in the HTML before they are sent to the client. However with Jamstack applications the HTML is pre-built and cached at the CDN. Most A/B testing tools for Jamstack applications insert the analytic script tags while the static files are being built and before they are cached at the CDN.
The problem in our case, is that we only have access to HTML that is already built and cached at the CDN. Now the question is how can we insert separate analytic script tags to each variant of a site, after the HTML is built and cached at the CDN.
5.1.2 Cloudflare's HTML Rewriter
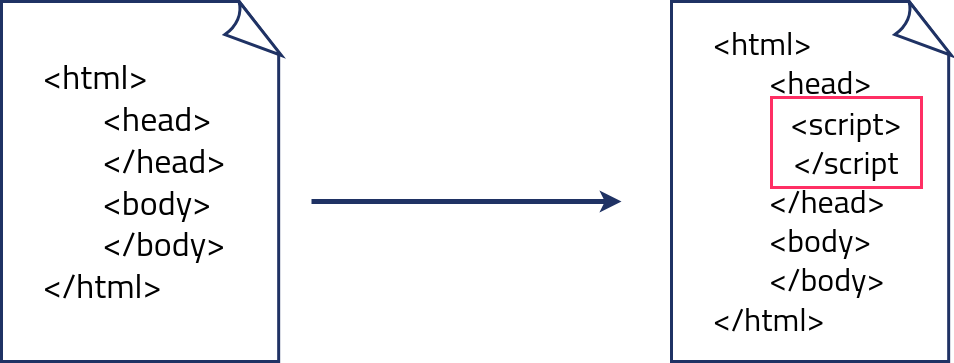
The solution is to insert the analytic script tag at the edge with Cloudflare’s HTMLRewriter. Cloudflare’s HTMLRewriter is a Javascript API that is accessible by Cloudflare Workers allowing us to parse and modify HTML.
So when our Worker fetches the cached HTML from the CDN, we use Cloudflare’s HTMLRewriter to insert the correct analytic script tag at the CDN edge before it is sent to the client.
5.2 Automating the Process of Enabling HTTPS
Another challenge was automating the process of enabling HTTPS for our Umami application
5.2.1 HTTP Problem
Initially Umami was using the HTTP protocol, this meant the traffic served over the internet to Umami was not secure. Not only was this a security issue but Umami’s analytic script tags would be blocked by most browsers.
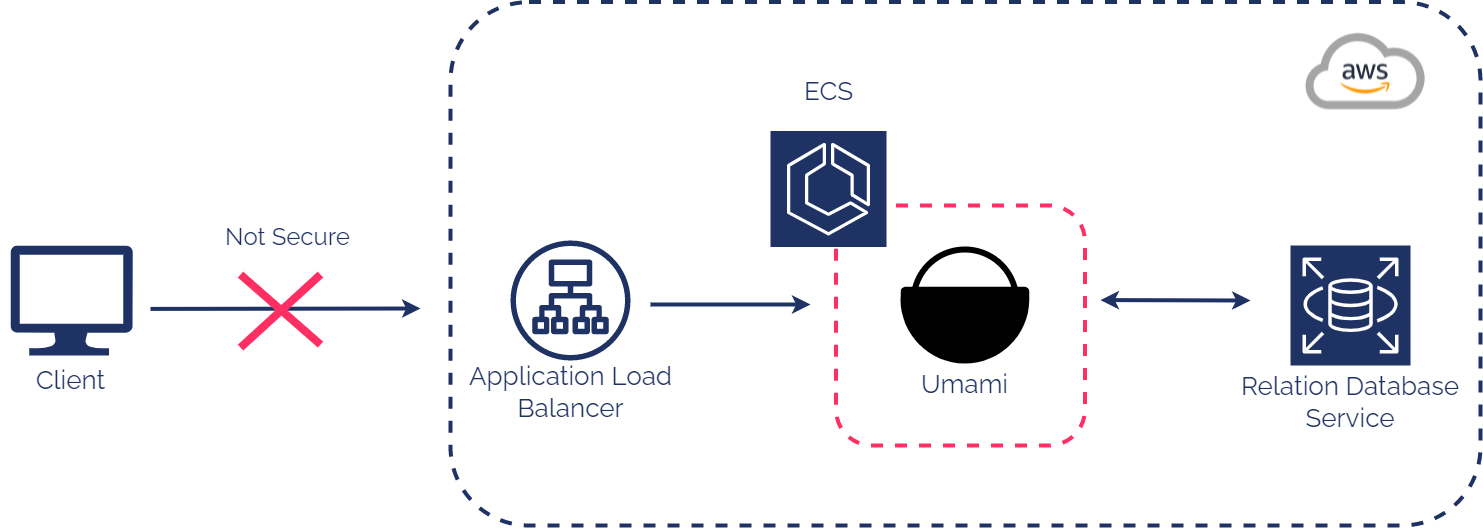
To use HTTPS we need a Transport Layer Security Certificate, also known as TLS certificate, which can be provided by AWS Certificate Manager. AWS Certificate Manager is a service that can manage and issue TLS certificates that can be used with AWS services.
We can use AWS Certificate Manager to issue a TLS certificate and attach it to our load balancer. However the AWS Certificate Manager cannot issue a certificate to a domain name provided by AWS, this means we need to provide a custom domain. This was troublesome because up until now we were using the domain name assigned to the application load balancer provided by AWS to access Umami.
We ended up issuing a certificate to the same domain name used for the A/B test on Cloudflare, with a subdomain of “ableumami”. For instance if a user wanted to set up an A/B test with Able using the domain “coffeebean.com”, then a digital certificate would be issued for “ableumami.coffeebean.com”.
Although issuing a certificate to a subdomain of “ableumami” and assigning the certificate to the load balancer seemed straightforward, the challenge was automating the process.
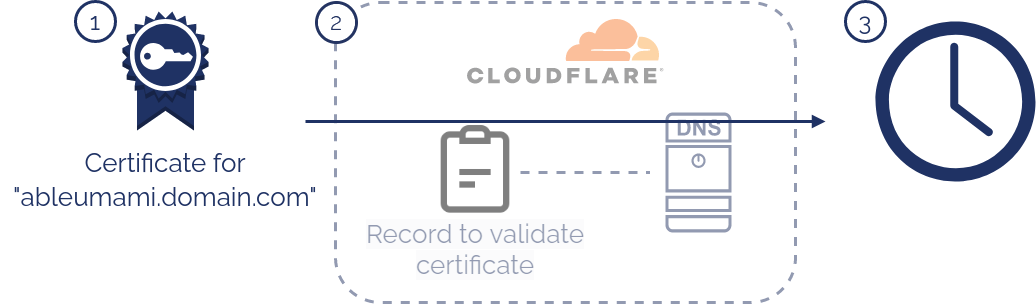
5.2.2 Steps to Setup HTTPS

Let's look at the necessary steps to enable HTTPS:
- Issue a certificate with Amazon Certificate Manager to a subdomain of “ableumami”.
- Validate the certificate by creating a DNS record in Cloudflare’s nameservers with the information provided by Amazon Certificate Manager.
- Wait until the certificate is validated, which can take a few minutes.
- Once the certificate is validated, assign the certificate to the application load balancer.
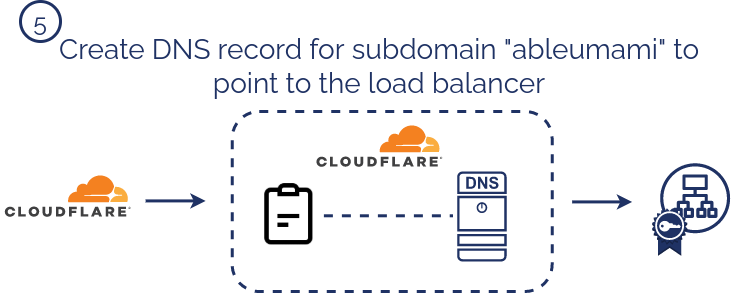
- Create another DNS record in Cloudflare’s nameservers for the subdomain “ableumami” which will point to the application load balancer.
5.2.3 Automating AWS infrastructure
Before we talk about how to automate the process of creating a certificate. Let’s see how the rest of our AWS infrastructure is built. Currently our AWS infrastructure is built with Cloudformation Templates created with Amazon’s CDK.
Cloudformation templates is a file written in JSON or YAML which AWS can use to automate the process of creating and provisioning your architecture. The CDK allows us to use JavaScript to create these Cloudformation templates, otherwise we would have to write hundreds of lines of code, if not more. For example we wrote 101 lines of code with the AWS CDK which creates a Cloudformation template with over 1000 lines of code in JSON format.
5.2.4 Cloudformation Problem
The problem with using Cloudformation templates to issue a certificate with AWS Certificate Manager is that once the certificate is created AWS will pause the deployment process until the Certificate is validated.
However, in order to validate the certificate we need to create a DNS record in Cloudflare’s nameservers which never happens. We went from Step 1 issuing a certificate to Step 3 waiting for the certificate to be successfully validated. Skipping the step needed to validate the certificate.
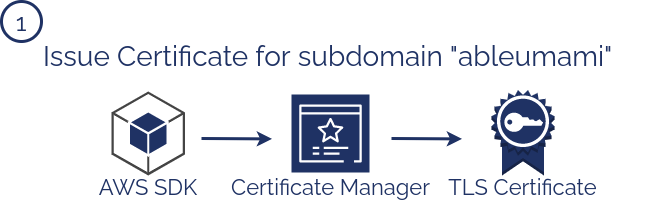
5.2.5 Amazon SDK
The solution is to create the certificate using Amazon Software Development Kit before we create and provision the rest of our AWS infrastructure with a Cloudformation Template. Amazon Software Development kit is another tool to build AWS infrastructure through the use of API endpoints instead of a Cloudformation template.
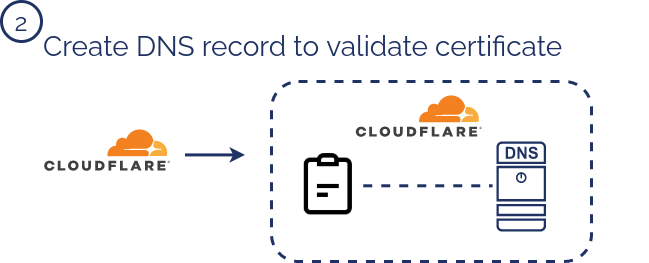
5.2.6 Automating the Steps to Setup HTTPS
Let’s see how Able handles automating the certificate process.
First, we use Amazon Software Development Kit to issue a certificate for a subdomain “ableumami”. A response is immediately sent back which was not possible when we used a Cloudformation template.
Second, we make a request to Cloudflare’s API to create a DNS record with the information provided by the previous response when we issued a certificate.
Third, we wait until the certificate is successfully validated through the process of polling. Polling means Able will repeatedly ask Amazon if the certificate has been validated.

Fourth Once the certificate has successfully been validated, we will attach the certificate to the application load balancer through the Cloudformation Template. This will also create and provision the rest of the AWS architecture.

Fifth and final step we make another request to Cloudflare’s API to create a DNS record for the subdomain “ableumami” which will point to the application load balancer.
6. Limitations and Opportunities
Currently, Able has all of its primary features implemented to conduct an A/B test for Jamstack applications. However, there are some future implementations that would strengthen our framework. Such as:
- Having our users be able to deploy multiple A/B tests. Currently we only allow one A/B test up and running.
- Providing a GUI for configuring tests instead of having users fill out our JSON template. This will not only enhance the user experience but make Able less prone to human errors.
- Supporting other Jamstack hosting platforms such as AWS amplify. As of now we only support Cloudflare pages.
7. Resources
7.1 Articles
- Optimizely
- Fastly Blog Article
- Outsmartly
- https://www.youtube.com/watch?v=t-A4F7Up7EY
- Fastly AB Tests
- Split Testing for Static Websites
- Medium - AB Testing on AWS
- Cost of Client-side Testing
- Outsmartly - Edge Slice Rerendering
- Obama A/B Test Example
- Github AWS Amplify issue - request for A/B Testing